Netty那点事(五)讲讲Handler
Netty那点事(五)讲讲Handler
至上部分为止,我觉得Netty的架构部分已经差不多说完了,还有些细节,可以在实践中慢慢掌握。
但是对于实践来说,Netty还有不容忽视的一部分:Netty提供了大量的ChannelHandler,可以完成不同的任务。用好它们,会使Netty在你手里更加得心应手!
业务多线程执行
OrderedMemoryAwareThreadPoolExecutor
使用Netty 4.1进行内存感知通道处理(Memory-aware Channel handling with Netty 4.1)
 在4(3.x)之前的Netty版本中,有一种方法可以通过执行程序OrderedMemoryAwareThreadPoolExecutor内存来进行通道处理,并使用OrderedMemoryAwareThreadPoolExecutor执行程序对其进行排序,以执行给定Channel 。 3.x中的OrderedMemoryAwareThreadPoolExecutor将负责为通道排序事件处理,即使它们可以由不同的线程执行,也可以限制Channel使用的总内存。 如果通道内存(由于排队事件)超过某个阈值,则会阻止事件的执行,直到释放内存为止。
 然而,在4.x中,没有这样的机制。 新的线程模型确实提供了对已执行事件的排序(因为特定通道的事件由单个线程执行),但似乎没有办法限制任何EventExecutorGroup单个Channel消耗的内存。 这意味着,如果无法做到这一点,发送到某个特定Channel的大量事件可能会耗尽服务器上的内存。 虽然我还没有对此事进行测试,但我认为在这里询问Netty 4.x的情况是否值得。
 所以我的问题基本上是:
 在Netty 4.x中使用带有ChannelHandler的EventExecutorGroup时,有没有办法限制单个Channel消耗的内存?


 这种情况是可能的。
 但是,Netty为您的频道提供了ChannelOption.WRITE_BUFFER_WATER_MARK选项。 因此,当您在某个频道写入太快并且待处理消息队列超过ChannelOption.WRITE_BUFFER_WATER_MARK限制时,您写入的频道将变得不可写。 所以你可以用以下方法保护你的代码
if (channel.isWritable()) {
}

 要么
if (ctx.channel().isWritable()) {
}

 因此,当通道繁忙或缓慢消耗事件时,可防止内存耗尽。
 您还可以为生成事件的通道更改ChannelOption.AUTO_READ ,并使用以下方法手动处理此事件:
 ctx.channel().config().setAutoRead(false);

 因此,您的服务器将停止从生成它们的通道中读取事件。 这是展示这种方式的pull请求 。
ExecutionHandler
如果业务处理handler耗时长,将严重影响可支持的并发数。
针对这一问题,经过学习,发现了可以使用ExecutionHandler来优化。
先来回顾一下没有使用ExecutionHandler优化的流程:
1)Boss线程(接收到客户端连接)->生成Channel->交给Worker线程池处理。
2)某个被分配到任务的Worker线程->读完已接收的数据到ChannelBuffer->触发ChannelPipeline中的ChannelHandler链来处理业务逻辑。
注意:执行ChannelHandler链的整个过程是同步的,如果业务逻辑的耗时较长,会将导致Work线程长时间被占用得不到释放,从而影响了整个服务器的并发处理能力。
一、引入ExecutionHandler优化
//HttpServerPipelineFactory.java
private final ExecutionHandler executionHandler = new ExecutionHandler(
             new OrderedMemoryAwareThreadPoolExecutor(16, 1048576, 1048576));
public class HttpServerPipelineFactory implements ChannelPipelineFactory {
    @Override
    public ChannelPipeline getPipeline() throws Exception {
        ChannelPipeline pipeline = Channels.pipeline();
        pipeline.addLast("decoder", new HttpRequestDecoder());
        pipeline.addLast("encoder", new HttpResponseEncoder());
        pipeline.addLast("execution", executionHandler);
        pipeline.addLast("handler", new HttpServerHandler());
        return pipeline;
    }
}
当我们引入ExecutionHandler后,原本同步的ChannelHandler链在经过 ExecutionHandler后就结束了,它会被ChannelFactory的worker线程池所回收,而剩下的ChannelHandler链将由ExecutionHandler的线程池接手处理。
对于ExecutionHandler需要的线程池模型,Netty提供了两种可选:
1) MemoryAwareThreadPoolExecutor 通过对线程池内存的使用控制,可控制Executor中待处理任务的上限(超过上限时,后续进来的任务将被阻塞),并可控制单个Channel待处理任务的上限,防止内存溢出错误。但是它不维持同一Channel的ChannelEvents秩序,当经过ExecutionHandler后的ChannelHandler链中有不止一个Handler时,这些事件驱动存在混乱的可能。例如:
----------------------------------------> Timeline ------------------------------------->
Thread X: --- Channel A (Event 2) --- Channel A (Event 1) ----------------------------->
Thread Y: --- Channel A (Event 3) --- Channel B (Event 2) --- Channel B (Event 3) --->
Thread Z: --- Channel B (Event 1) --- Channel B (Event 4) --- Channel A (Event 4) --->
2) OrderedMemoryAwareThreadPoolExecutor 是 MemoryAwareThreadPoolExecutor 的子类。除了MemoryAwareThreadPoolExecutor 的功能之外,它还可以保证同一Channel中处理的事件流的顺序性(不同Channel使用不同的key保持事件顺序),这主要是控制事件在异步处理模式下可能出现的错误事件顺序,但它并不保证同一 Channel中的事件都在一个线程中执行(通常也没必要)。例如:
----------------------------------------> Timeline ---------------------------------------->`` ``Thread X: --- Channel A (Event ``1``) --. .-- Channel B (Event ``2``) --- Channel B (Event ``3``) --->`` ``\ /`` ``X`` ``/ \`` ``Thread Y: --- Channel B (Event ``1``) --``' '``-- Channel A (Event ``2``) --- Channel A (Event ``3``) --->
二、具有可伸缩性的OrderedMemoryAwareThreadPoolExecutor****使用策略
在大多数情况下,我们会使用OrderedMemoryAwareThreadPoolExecutor,它的构造函数要求我们提供线程池的大小,在上面的代码中,我们使用了16这个具体的值,是一种很不好的写法,通常情况下,我们会使用配置文件使之可变,但是在实际部署时,并不能保证实施人员能很好的去调整,故提供如下的一种写法:
double coefficient = 0.8;  //系数
int numberOfCores = Runtime.getRuntime().availableProcessors();
int poolSize = (int)(numberOfCores / (1 - coefficient));
我们可以使用poolSize取代OrderedMemoryAwareThreadPoolExecutor(16, 1048576, 1048576)中的那个16,因为当一个系统被开发出来后,它是CPU密集型还是IO密集型是可评估的,通过评估其密集型,调整系数即可:CPU密集型接近0,IO密集型接近1。
粘包/分包
1. DelimiterBasedFrameDecoder使用特殊字符作为分割,如果使用的话,注意特殊字符不能在真正要传输的内容中出现,
客户端
|
|
客户端的handler
|
|
服务端
|
|
服务端的handler
|
|
2. FixedLengthFrameDecoder定长,这个也不常用
|
|
客户端发送的消息为HelloServer11个字节,可以看到超出的r会放到下一次的消息中, 一个汉字为3个字节,所以很难在实际项目中使用 客户端发送消息是:HelloServe 客户端发送消息是:rHelloServ
3. LineBasedFrameDecoder 换行符在发送消息加上换行符 \n
|
|
4. LengthFieldBasedFrameDecoder和LengthFieldPrepender
LengthFieldPrepender编码器,将发送消息的前面加上请求体的字节长度 LengthFieldBasedFrameDecoder获取请求头的长度,根据长度获取请求体的信息 个人认为这个比较常用 客户端
|
|
客户端handler
|
|
服务端
|
|
服务端handler
|
|
TCP粘包和拆包
-
TCP是面向连接的, 面向流的, 提供可靠性服务, 收发两端(客户端和服务器端) 都有一一成对的Socket,因此发送端为了将多个发给接收端的包, 更有效的发给对方, 使用了优化算法(Nagle算法),将多次间隔较小且数据量小的数据,合并成一个大的数据块,然后进行封包, 这样做虽然提高了效率,但是接收端就难于分辨出完整的数据包了,因为面向流的通信是无消息保护边界的
-
由于TCP无消息保护边界, 需要在接收端处理消息边界问题, 也就是我们所说的粘包,拆包问题,看一张图
-
示意图TCP粘包,拆包图解
对图的说明
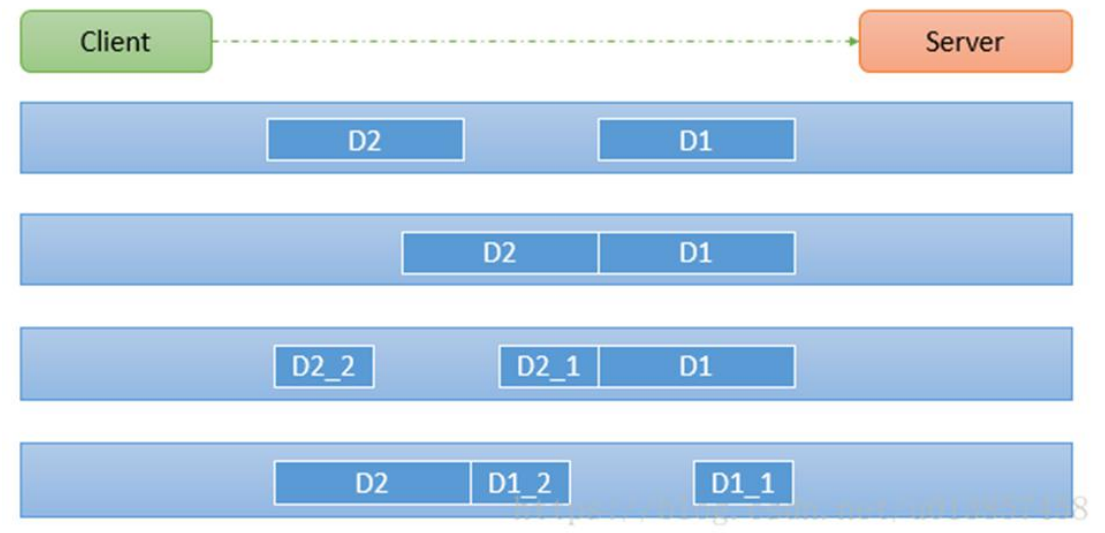
假设客户端分别发送了两个数据包D1和D2给服务端, 由于服务端一次读取到字节数是不确定的,故有可能存在以下四种情况
-
服务端分别两次读取到了两个独立的数据包, 分别是D1 和 D2, 没有粘包和拆包
-
服务端一次接收到了两个数据包D1和D2粘在了一起,称之为TCP粘包
-
服务端分两次读取到了数据包, 第一次读取到了完整的D1包和D2包的部分内容, 第二次读取到了D2包的剩余部分, 称之为TCP拆包
-
服务器分两次读取到了数据包, 第一次读取到了D1包的部分内容D1_1, 第二次读取到了D1包的剩余部分D1_2, 和完整的D2包
TCP粘包和拆包现象实例
在编写Netty程序时, 如果没有做处理,就会发生粘包和拆包问题
看一个具体的实例
NettyServer
package com.dance.netty.netty.tcp;

import io.netty.bootstrap.ServerBootstrap;
import io.netty.buffer.ByteBuf;
import io.netty.buffer.Unpooled;
import io.netty.channel.*;
import io.netty.channel.nio.NioEventLoopGroup;
import io.netty.channel.socket.SocketChannel;
import io.netty.channel.socket.nio.NioServerSocketChannel;

import java.nio.charset.StandardCharsets;
import java.util.UUID;

public class NettyServer {

    public static void main(String[] args) {

        NioEventLoopGroup bossGroup = new NioEventLoopGroup(1);
        NioEventLoopGroup workerGroup = new NioEventLoopGroup();
        try {
            ServerBootstrap serverBootstrap = new ServerBootstrap();
            serverBootstrap.group(bossGroup,workerGroup)
                    .channel(NioServerSocketChannel.class)
                    .option(ChannelOption.SO_BACKLOG, 128)
                    .childOption(ChannelOption.SO_KEEPALIVE, true)
                    .childHandler(new ChannelInitializer<SocketChannel>() {
                        @Override
                        protected void initChannel(SocketChannel ch) throws Exception {
                            ChannelPipeline pipeline = ch.pipeline();
                            pipeline.addLast(new NettyServerHandler());
                        }
                    });
            ChannelFuture sync = serverBootstrap.bind("127.0.0.1", 7000).sync();
            System.out.println("server is ready ......");
            sync.channel().closeFuture().sync();
        } catch (Exception e) {
            e.printStackTrace();
        } finally {
            bossGroup.shutdownGracefully();
            workerGroup.shutdownGracefully();
        }

    }

    static class NettyServerHandler extends SimpleChannelInboundHandler<ByteBuf> {

        private int count = 0;

        @Override
        protected void channelRead0(ChannelHandlerContext ctx, ByteBuf msg) throws Exception {
            byte[] bytes = new byte[msg.readableBytes()];
            msg.readBytes(bytes);
            count++;
            System.out.println("服务器第"+count+"次接收到来自客户端的数据:" + new String(bytes, StandardCharsets.UTF_8));
            // 服务器回送数据给客户端 回送随机的UUID给客户端
            ctx.writeAndFlush(Unpooled.copiedBuffer(UUID.randomUUID().toString(),StandardCharsets.UTF_8));
        }

        @Override
        public void exceptionCaught(ChannelHandlerContext ctx, Throwable cause) throws Exception {
            ctx.close();
            cause.printStackTrace();
        }
    }

}
NettyClient
package com.dance.netty.netty.tcp;

import io.netty.bootstrap.Bootstrap;
import io.netty.buffer.ByteBuf;
import io.netty.buffer.Unpooled;
import io.netty.channel.*;
import io.netty.channel.nio.NioEventLoopGroup;
import io.netty.channel.socket.SocketChannel;
import io.netty.channel.socket.nio.NioSocketChannel;

import java.nio.charset.StandardCharsets;

public class NettyClient {
    public static void main(String[] args) {
        NioEventLoopGroup eventExecutors = new NioEventLoopGroup();
        try {
            Bootstrap bootstrap = new Bootstrap();
            bootstrap.group(eventExecutors)
                    .channel(NioSocketChannel.class)
                    .handler(new ChannelInitializer<SocketChannel>() {
                        @Override
                        protected void initChannel(SocketChannel ch) throws Exception {
                            ChannelPipeline pipeline = ch.pipeline();
                            pipeline.addLast(new NettyClientHandler());
                        }
                    });
            ChannelFuture sync = bootstrap.connect("127.0.0.1", 7000).sync();
            sync.channel().closeFuture().sync();
        } catch (Exception e) {
            e.printStackTrace();
        } finally {
            eventExecutors.shutdownGracefully();
        }
    }

    static class NettyClientHandler extends SimpleChannelInboundHandler<ByteBuf> {

        private int count = 0;

        @Override
        public void channelActive(ChannelHandlerContext ctx) throws Exception {
            // 连续发送10条数据
            for (int i = 0; i < 10; i++) {
                ctx.writeAndFlush(Unpooled.copiedBuffer("hello,server!" + i, StandardCharsets.UTF_8));
            }
        }

        @Override
        protected void channelRead0(ChannelHandlerContext ctx, ByteBuf msg) throws Exception {
            byte[] bytes = new byte[msg.readableBytes()];
            msg.readBytes(bytes);
            // 接收服务器的返回
            count++;
            System.out.println("客户端第"+count+"次接收服务端的回送:" + new String(bytes, StandardCharsets.UTF_8));
        }

        @Override
        public void exceptionCaught(ChannelHandlerContext ctx, Throwable cause) throws Exception {
            ctx.close();
            cause.printStackTrace();
        }
    }
}
执行结果
Server
log4j:WARN No appenders could be found for logger (io.netty.util.internal.logging.InternalLoggerFactory).
log4j:WARN Please initialize the log4j system properly.
log4j:WARN See http://logging.apache.org/log4j/1.2/faq.html#noconfig for more info.
server is ready ......
服务器第1次接收到来自客户端的数据:hello,server!0hello,server!1hello,server!2hello,server!3hello,server!4hello,server!5hello,server!6hello,server!7hello,server!8hello,server!9
服务器第1次接收到来自客户端的数据:hello,server!0
服务器第2次接收到来自客户端的数据:hello,server!1
服务器第3次接收到来自客户端的数据:hello,server!2hello,server!3hello,server!4
服务器第4次接收到来自客户端的数据:hello,server!5hello,server!6
服务器第5次接收到来自客户端的数据:hello,server!7hello,server!8hello,server!9
Client1
客户端第1次接收服务端的回送:84653e99-0e7f-431d-a897-c215af959a3b
Client2
客户端第1次接收服务端的回送:6f3b0e79-2f40-4066-bb6b-80f988ecec116b6bbd94-b345-46d6-8d36-a114534331a850628e04-ece1-4f58-b684-d30189f6cf26b2139027-6bda-4d40-9238-9fc0e59bc7a64b568ffe-f616-4f48-8f1c-05ecf3e817ee
分析:
服务器启动后到server is ready ……
第一个客户端启动后 TCP将10次发送直接封包成一次直接发送,所以导致了服务器一次就收到了所有的数据,产生了TCP粘包,拆包的问题
第二客户端启动后 TCP将10次发送分别封装成了5次请求,产生粘包,拆包问题
TCP粘包和拆包解决方案
- 使用自定义协议 + 编解码器来解决
- 关键就是要解决 服务器每次读取数据长度的问题, 这个问题解决, 就不会出现服务器多读或少读数据的问题,从而避免TCP粘包和拆包
TCP粘包, 拆包解决方案实现
- 要求客户端发送5个Message对象, 客户端每次发送一个Message对象
- 服务器端每次接收一个Message, 分5次进行解码, 每读到一个Message, 会回复一个Message对象给客户端

新建协议MessageProtocol
package com.dance.netty.netty.protocoltcp;

/**
 * 消息协议
 */
public class MessageProtocol {

    private int length;

    private byte[] content;

    public MessageProtocol() {
    }

    public MessageProtocol(int length, byte[] content) {
        this.length = length;
        this.content = content;
    }

    public int getLength() {
        return length;
    }

    public void setLength(int length) {
        this.length = length;
    }

    public byte[] getContent() {
        return content;
    }

    public void setContent(byte[] content) {
        this.content = content;
    }
}
新建编码器
package com.dance.netty.netty.protocoltcp;

import io.netty.buffer.ByteBuf;
import io.netty.channel.ChannelHandlerContext;
import io.netty.handler.codec.MessageToByteEncoder;

/**
 * 自定义协议编码器
 */
public class MyMessageProtocolEncoder extends MessageToByteEncoder<MessageProtocol> {
    @Override
    protected void encode(ChannelHandlerContext ctx, MessageProtocol msg, ByteBuf out) throws Exception {
//        System.out.println("自定义协议---->开始编码");
        // 开始发送数据
        out.writeInt(msg.getLength()); // 优先发送长度,定义边界
        out.writeBytes(msg.getContent());
//        System.out.println("自定义协议---->编码完成");
    }
}
新建解码器
package com.dance.netty.netty.protocoltcp;

import io.netty.buffer.ByteBuf;
import io.netty.channel.ChannelHandlerContext;
import io.netty.handler.codec.ByteToMessageDecoder;

import java.util.List;

public class MyMessageProtocolDecoder extends ByteToMessageDecoder {
    @Override
    protected void decode(ChannelHandlerContext ctx, ByteBuf in, List<Object> out) throws Exception {
//        System.out.println("自定义协议---->开始解码");
        // 获取定义的边界长度
        int length = in.readInt();
        if(in.readableBytes() >= length){
            // 根据长度读取数据
            byte[] bytes = new byte[length];
            in.readBytes(bytes);
            // 反构造成MessageProtocol
            MessageProtocol messageProtocol = new MessageProtocol(length, bytes);
            out.add(messageProtocol);
//            System.out.println("自定义协议---->解码完成");
        }else{
            // 内容长度不够
        }
    }
}
新建服务器端
package com.dance.netty.netty.protocoltcp;

import io.netty.bootstrap.ServerBootstrap;
import io.netty.buffer.ByteBuf;
import io.netty.buffer.Unpooled;
import io.netty.channel.*;
import io.netty.channel.nio.NioEventLoopGroup;
import io.netty.channel.socket.SocketChannel;
import io.netty.channel.socket.nio.NioServerSocketChannel;

import java.nio.charset.StandardCharsets;
import java.util.UUID;

public class NettyServer {

    public static void main(String[] args) {

        NioEventLoopGroup bossGroup = new NioEventLoopGroup(1);
        NioEventLoopGroup workerGroup = new NioEventLoopGroup();
        try {
            ServerBootstrap serverBootstrap = new ServerBootstrap();
            serverBootstrap.group(bossGroup,workerGroup)
                    .channel(NioServerSocketChannel.class)
                    .option(ChannelOption.SO_BACKLOG, 128)
                    .childOption(ChannelOption.SO_KEEPALIVE, true)
                    .childHandler(new ChannelInitializer<SocketChannel>() {
                        @Override
                        protected void initChannel(SocketChannel ch) throws Exception {
                            ChannelPipeline pipeline = ch.pipeline();
                            // 加入自定义协议编解码器
                            pipeline.addLast(new MyMessageProtocolDecoder());
                            pipeline.addLast(new MyMessageProtocolEncoder());
                            pipeline.addLast(new NettyServerHandler());
                        }
                    });
            ChannelFuture sync = serverBootstrap.bind("127.0.0.1", 7000).sync();
            System.out.println("server is ready ......");
            sync.channel().closeFuture().sync();
        } catch (Exception e) {
            e.printStackTrace();
        } finally {
            bossGroup.shutdownGracefully();
            workerGroup.shutdownGracefully();
        }

    }

    static class NettyServerHandler extends SimpleChannelInboundHandler<MessageProtocol> {

        private int count = 0;

        @Override
        protected void channelRead0(ChannelHandlerContext ctx, MessageProtocol msg) throws Exception {
            byte[] bytes = msg.getContent();
            count++;
            System.out.println("服务器第"+count+"次接收到来自客户端的数据:" + new String(bytes, StandardCharsets.UTF_8));
            // 服务器回送数据给客户端 回送随机的UUID给客户端
            byte[] s = UUID.randomUUID().toString().getBytes(StandardCharsets.UTF_8);
            ctx.writeAndFlush(new MessageProtocol(s.length,s));
        }

        @Override
        public void exceptionCaught(ChannelHandlerContext ctx, Throwable cause) throws Exception {
            ctx.close();
            cause.printStackTrace();
        }
    }

}
新建客户端
package com.dance.netty.netty.protocoltcp;

import io.netty.bootstrap.Bootstrap;
import io.netty.buffer.ByteBuf;
import io.netty.buffer.Unpooled;
import io.netty.channel.*;
import io.netty.channel.nio.NioEventLoopGroup;
import io.netty.channel.socket.SocketChannel;
import io.netty.channel.socket.nio.NioSocketChannel;

import java.nio.charset.StandardCharsets;

public class NettyClient {
    public static void main(String[] args) {
        NioEventLoopGroup eventExecutors = new NioEventLoopGroup();
        try {
            Bootstrap bootstrap = new Bootstrap();
            bootstrap.group(eventExecutors)
                    .channel(NioSocketChannel.class)
                    .handler(new ChannelInitializer<SocketChannel>() {
                        @Override
                        protected void initChannel(SocketChannel ch) throws Exception {
                            ChannelPipeline pipeline = ch.pipeline();
                            // 加入自定义分割符号
//                            ByteBuf delimiter = Unpooled.copiedBuffer("\r\n".getBytes());
//                            pipeline.addFirst(new DelimiterBasedFrameDecoder(8192, delimiter));

                            // 添加自定义协议编解码器
                            pipeline.addLast(new MyMessageProtocolDecoder());
                            pipeline.addLast(new MyMessageProtocolEncoder());
                            pipeline.addLast(new NettyClientHandler());
                        }
                    });
            ChannelFuture sync = bootstrap.connect("127.0.0.1", 7000).sync();
            sync.channel().closeFuture().sync();
        } catch (Exception e) {
            e.printStackTrace();
        } finally {
            eventExecutors.shutdownGracefully();
        }
    }

    static class NettyClientHandler extends SimpleChannelInboundHandler<MessageProtocol> {

        private int count = 0;

        @Override
        public void channelActive(ChannelHandlerContext ctx) throws Exception {
            // 连续发送10条数据
            for (int i = 0; i < 10; i++) {
                String msg = "今天天气冷, 打火锅" + i;
                byte[] bytes = msg.getBytes(StandardCharsets.UTF_8);
                // 使用自定义协议
                MessageProtocol messageProtocol = new MessageProtocol(bytes.length, bytes);
                ctx.writeAndFlush(messageProtocol);
            }
        }

        @Override
        protected void channelRead0(ChannelHandlerContext ctx, MessageProtocol msg) throws Exception {
            byte[] bytes = msg.getContent();
            // 接收服务器的返回
            count++;
            System.out.println("客户端第"+count+"次接收服务端的回送:" + new String(bytes, StandardCharsets.UTF_8));
        }

        @Override
        public void exceptionCaught(ChannelHandlerContext ctx, Throwable cause) throws Exception {
            ctx.close();
            cause.printStackTrace();
        }
    }
}
测试
发送10次
服务器端
log4j:WARN No appenders could be found for logger (io.netty.util.internal.logging.InternalLoggerFactory).
log4j:WARN Please initialize the log4j system properly.
log4j:WARN See http://logging.apache.org/log4j/1.2/faq.html#noconfig for more info.
server is ready ......
服务器第1次接收到来自客户端的数据:今天天气冷, 打火锅0
......
服务器第10次接收到来自客户端的数据:今天天气冷, 打火锅9
客户端
log4j:WARN No appenders could be found for logger (io.netty.util.internal.logging.InternalLoggerFactory).
log4j:WARN Please initialize the log4j system properly.
log4j:WARN See http://logging.apache.org/log4j/1.2/faq.html#noconfig for more info.
客户端第1次接收服务端的回送:a6b69f1c-daba-435a-802a-c19a6350ca94
......
客户端第10次接收服务端的回送:5af5c297-8668-48aa-b8c4-35656142f591
ok,没有问题, 但是真的没有问题吗?答案是有问题
FAQ
发送1000次
修改客户端发送消息数量
@Override
public void channelActive(ChannelHandlerContext ctx) throws Exception {
    // 连续发送10条数据
    for (int i = 0; i < 1000; i++) {
        ......
    }
}
重新测试
服务器端
log4j:WARN No appenders could be found for logger (io.netty.util.internal.logging.InternalLoggerFactory).
log4j:WARN Please initialize the log4j system properly.
log4j:WARN See http://logging.apache.org/log4j/1.2/faq.html#noconfig for more info.
server is ready ......
服务器第1次接收到来自客户端的数据:今天天气冷, 打火锅0
......
服务器第31次接收到来自客户端的数据:今天天气冷, 打火锅30
服务器第32次接收到来自客户端的数据:今天天气冷, 打火锅31
io.netty.handler.codec.DecoderException: java.lang.NegativeArraySizeException
    at io.netty.handler.codec.ByteToMessageDecoder.callDecode(ByteToMessageDecoder.java:459)
    at io.netty.handler.codec.ByteToMessageDecoder.channelRead(ByteToMessageDecoder.java:265)
    at io.netty.channel.AbstractChannelHandlerContext.invokeChannelRead(AbstractChannelHandlerContext.java:362)
    at io.netty.channel.AbstractChannelHandlerContext.invokeChannelRead(AbstractChannelHandlerContext.java:348)
    at io.netty.channel.AbstractChannelHandlerContext.fireChannelRead(AbstractChannelHandlerContext.java:340)
    at io.netty.channel.DefaultChannelPipeline$HeadContext.channelRead(DefaultChannelPipeline.java:1412)
    at io.netty.channel.AbstractChannelHandlerContext.invokeChannelRead(AbstractChannelHandlerContext.java:362)
    at io.netty.channel.AbstractChannelHandlerContext.invokeChannelRead(AbstractChannelHandlerContext.java:348)
    at io.netty.channel.DefaultChannelPipeline.fireChannelRead(DefaultChannelPipeline.java:943)
    at io.netty.channel.nio.AbstractNioByteChannel$NioByteUnsafe.read(AbstractNioByteChannel.java:141)
    at io.netty.channel.nio.NioEventLoop.processSelectedKey(NioEventLoop.java:645)
    at io.netty.channel.nio.NioEventLoop.processSelectedKeysOptimized(NioEventLoop.java:580)
    at io.netty.channel.nio.NioEventLoop.processSelectedKeys(NioEventLoop.java:497)
    at io.netty.channel.nio.NioEventLoop.run(NioEventLoop.java:459)
    at io.netty.util.concurrent.SingleThreadEventExecutor$5.run(SingleThreadEventExecutor.java:886)
    at io.netty.util.concurrent.FastThreadLocalRunnable.run(FastThreadLocalRunnable.java:30)
    at java.lang.Thread.run(Thread.java:748)
Caused by: java.lang.NegativeArraySizeException
    at com.dance.netty.netty.protocoltcp.MyMessageProtocolDecoder.decode(MyMessageProtocolDecoder.java:17)
    at io.netty.handler.codec.ByteToMessageDecoder.decodeRemovalReentryProtection(ByteToMessageDecoder.java:489)
    at io.netty.handler.codec.ByteToMessageDecoder.callDecode(ByteToMessageDecoder.java:428)
    ... 16 more
io.netty.handler.codec.DecoderException: java.lang.IndexOutOfBoundsException: readerIndex(1022) + length(4) exceeds writerIndex(1024): PooledUnsafeDirectByteBuf(ridx: 1022, widx: 1024, cap: 1024)
    at io.netty.handler.codec.ByteToMessageDecoder.callDecode(ByteToMessageDecoder.java:459)
    at io.netty.handler.codec.ByteToMessageDecoder.channelInputClosed(ByteToMessageDecoder.java:392)
    at io.netty.handler.codec.ByteToMessageDecoder.channelInputClosed(ByteToMessageDecoder.java:359)
    at io.netty.handler.codec.ByteToMessageDecoder.channelInactive(ByteToMessageDecoder.java:342)
    at io.netty.channel.AbstractChannelHandlerContext.invokeChannelInactive(AbstractChannelHandlerContext.java:245)
    at io.netty.channel.AbstractChannelHandlerContext.invokeChannelInactive(AbstractChannelHandlerContext.java:231)
    at io.netty.channel.AbstractChannelHandlerContext.fireChannelInactive(AbstractChannelHandlerContext.java:224)
    at io.netty.channel.DefaultChannelPipeline$HeadContext.channelInactive(DefaultChannelPipeline.java:1407)
    at io.netty.channel.AbstractChannelHandlerContext.invokeChannelInactive(AbstractChannelHandlerContext.java:245)
    at io.netty.channel.AbstractChannelHandlerContext.invokeChannelInactive(AbstractChannelHandlerContext.java:231)
    at io.netty.channel.DefaultChannelPipeline.fireChannelInactive(DefaultChannelPipeline.java:925)
    at io.netty.channel.AbstractChannel$AbstractUnsafe$8.run(AbstractChannel.java:822)
    at io.netty.util.concurrent.AbstractEventExecutor.safeExecute(AbstractEventExecutor.java:163)
    at io.netty.util.concurrent.SingleThreadEventExecutor.runAllTasks(SingleThreadEventExecutor.java:404)
    at io.netty.channel.nio.NioEventLoop.run(NioEventLoop.java:463)
    at io.netty.util.concurrent.SingleThreadEventExecutor$5.run(SingleThreadEventExecutor.java:886)
    at io.netty.util.concurrent.FastThreadLocalRunnable.run(FastThreadLocalRunnable.java:30)
    at java.lang.Thread.run(Thread.java:748)
Caused by: java.lang.IndexOutOfBoundsException: readerIndex(1022) + length(4) exceeds writerIndex(1024): PooledUnsafeDirectByteBuf(ridx: 1022, widx: 1024, cap: 1024)
    at io.netty.buffer.AbstractByteBuf.checkReadableBytes0(AbstractByteBuf.java:1403)
    at io.netty.buffer.AbstractByteBuf.readInt(AbstractByteBuf.java:786)
    at com.dance.netty.netty.protocoltcp.MyMessageProtocolDecoder.decode(MyMessageProtocolDecoder.java:14)
    at io.netty.handler.codec.ByteToMessageDecoder.decodeRemovalReentryProtection(ByteToMessageDecoder.java:489)
    at io.netty.handler.codec.ByteToMessageDecoder.callDecode(ByteToMessageDecoder.java:428)
    ... 17 more
what ? 直接报错了, 数组下标越界, 读索引1022 + 长度4 > 写缩影1024了
这个是什么问题呢 ? 我看网上关于这个BUG的解决方案很少,基本没有, 好多都是贴问题的, 我翻了将近1个小时,才找到一个大佬写的一篇文章解决了, 感谢大佬
博客地址:
https://blog.csdn.net/u011035407/article/details/80454511
问题描述:
这样在刚开始的工作中数据包传输没有问题,不过数据包的大小超过512b的时候就会抛出异常了。
解决方案
配合解码器DelimiterBasedFrameDecoder一起使用,在数据包的末尾使用换行符\n表示本次数据包已经结束,当DelimiterBasedFrameDecoder把数据切割之后,再使用ByteToMessageDecoder实现decode方法把数据流转换为Message对象。
我们在ChannelPipeline加入DelimiterBasedFrameDecoder解码器
客户端和服务器端都加
//使用\n作为分隔符
pipeline.addLast(new LoggingHandler(LogLevel.INFO));
pipeline.addLast(new DelimiterBasedFrameDecoder(8192, Delimiters.lineDelimiter()));
在MessageToByteEncoder的实现方法encode()增加out.writeBytes(new byte[]{’\n’});
//在写出字节流的末尾增加\n表示数据结束
out.writeBytes(new byte[]{'\n'});
这时候就可以愉快的继续处理数据了。 等我还没有高兴半天的时候,问题又来了。还是一样的问题
等等等,,,怎么又报错了,不是已经加了黏包处理了吗??,解决问题把,首先看解析的数据包结构
         +-------------------------------------------------+
         |  0  1  2  3  4  5  6  7  8  9  a  b  c  d  e  f |
+--------+-------------------------------------------------+----------------+
|00000000| 01 01 01 00 00 00 06 00 00 01 0a 7b 22 69 64 22 |...........{"id"|
|00000010| 3a 33 2c 22 75 73 65 72 6e 61 6d 65 22 3a 22 31 |:3,"username":"1|
|00000020| 38 35 30 30 33 34 30 31 36 39 22 2c 22 6e 69 63 |8500340169","nic|
|00000030| 6b 6e 61 6d 65 22 3a 22 e4 bb 96 e5 9b 9b e5 a4 |kname":"........|
|00000040| a7 e7 88 b7 22 2c 22 72 6f 6f 6d 49 64 22 3a 31 |....","roomId":1|
|00000050| 35 32 37 32 33 38 35 36 39 34 37 34 2c 22 74 65 |527238569474,"te|
|00000060| 61 6d 4e 61 6d 65 22 3a 22 e4 bf 84 e7 bd 97 e6 |amName":".......|
|00000070| 96 af 22 2c 22 75 6e 69 74 73 22 3a 7b 22 75 6e |..","units":{"un|
|00000080| 69 74 31 22 3a 7b 22 78 22 3a 31 30 2e 30 2c 22 |it1":{"x":10.0,"|
|00000090| 79 22 3a 31 30 2e 30 7d 2c 22 75 6e 69 74 32 22 |y":10.0},"unit2"|
|000000a0| 3a 7b 22 78 22 3a 31 30 2e 30 2c 22 79 22 3a 31 |:{"x":10.0,"y":1|
|000000b0| 30 2e 30 7d 2c 22 75 6e 69 74 33 22 3a 7b 22 78 |0.0},"unit3":{"x|
|000000c0| 22 3a 31 30 2e 30 2c 22 79 22 3a 31 30 2e 30 7d |":10.0,"y":10.0}|
|000000d0| 2c 22 75 6e 69 74 34 22 3a 7b 22 78 22 3a 31 30 |,"unit4":{"x":10|
|000000e0| 2e 30 2c 22 79 22 3a 31 30 2e 30 7d 2c 22 75 6e |.0,"y":10.0},"un|
|000000f0| 69 74 35 22 3a 7b 22 78 22 3a 31 30 2e 30 2c 22 |it5":{"x":10.0,"|
|00000100| 79 22 3a 31 30 2e 30 7d 7d 2c 22 73 74 61 74 75 |y":10.0}},"statu|
|00000110| 73 22 3a 31 7d 0a                               |s":1}.          |
+--------+-------------------------------------------------+----------------+
接收到的数据是完整的没错,但是还是报错了,而且数据结尾的字节的确是0a,转化成字符就是\n没有问题啊。
在ByteToMessageDecoder的decode方法里打印ByteBuf buf的长度之后,问题找到了 长度 : 10
这就是说在进入到ByteToMessageDecoder这个解码器的时候,数据包已经只剩下10个长度了,那么长的数据被上个解码器DelimiterBasedFrameDecoder隔空劈开了- -。问题出现在哪呢,看上面那块字节流的字节,找到第11个字节,是0a。。。。因为不是标准的json格式,最前面使用了3个字节 加上2个int长度的属性,所以 数据包头应该是11个字节长。
而DelimiterBasedFrameDecoder在读到第11个字节的时候读成了\n,自然而然的就认为这个数据包已经结束了,而数据进入到ByteToMessageDecoder的时候就会因为规定的body长度不等于length长度而出现问题。
思来想去 不实用\n 这样的单字节作为换行符,很容易在数据流中遇到,转而使用\r\n俩字节来处理,而这俩字节出现在前面两个int长度中的几率应该很小。
最终解决
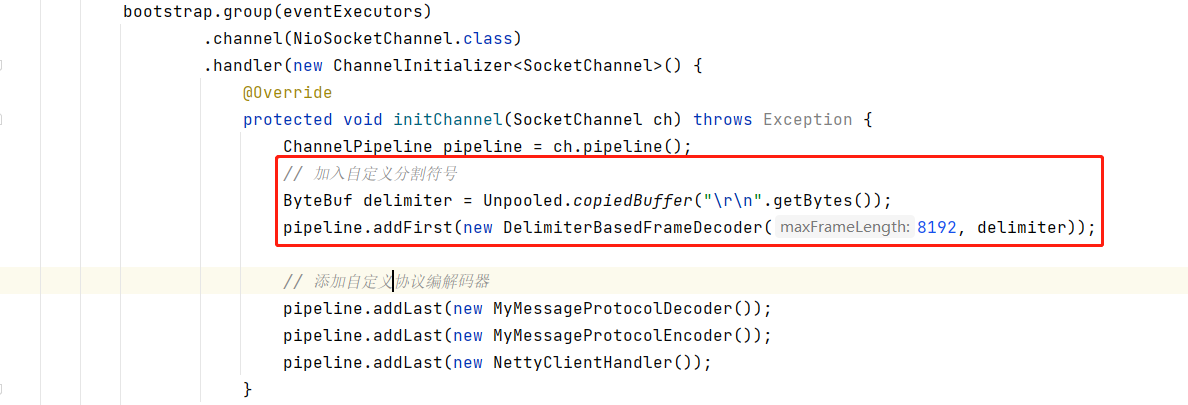
在客户端和服务器端的pipeline中添加 以 “\r\n” 定义为边界的符号来标识数据包结束
//这里使用自定义分隔符
ByteBuf delimiter = Unpooled.copiedBuffer("\r\n".getBytes());
pipeline.addFirst(new DelimiterBasedFrameDecoder(8192, delimiter));
Server端

Client端
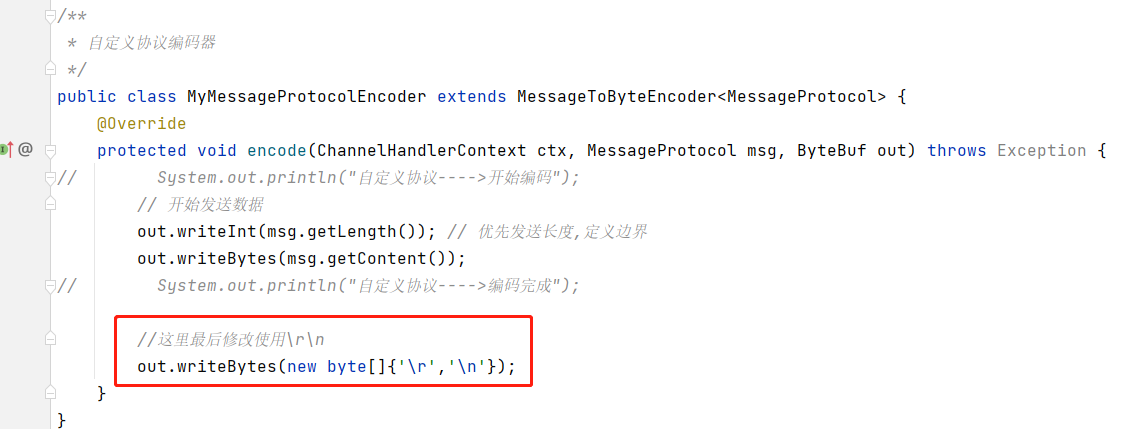
编码器中发送结束位置增加
//这里最后修改使用\r\n
out.writeBytes(new byte[]{'\r','\n'});
再次运行程序 数据包可以正常接收了。
最终测试
服务器端
log4j:WARN No appenders could be found for logger (io.netty.util.internal.logging.InternalLoggerFactory).
log4j:WARN Please initialize the log4j system properly.
log4j:WARN See http://logging.apache.org/log4j/1.2/faq.html#noconfig for more info.
server is ready ......
服务器第1次接收到来自客户端的数据:今天天气冷, 打火锅0
......
服务器第999次接收到来自客户端的数据:今天天气冷, 打火锅998
服务器第1000次接收到来自客户端的数据:今天天气冷, 打火锅999
客户端
log4j:WARN No appenders could be found for logger (io.netty.util.internal.logging.InternalLoggerFactory).
log4j:WARN Please initialize the log4j system properly.
log4j:WARN See http://logging.apache.org/log4j/1.2/faq.html#noconfig for more info.
客户端第1次接收服务端的回送:48fa6d78-8079-4700-b488-ca2af9eb3f8c
......
客户端第999次接收服务端的回送:581da47b-d77b-4972-af11-6d33057f6610
客户端第1000次接收服务端的回送:0014e906-69cb-4900-9409-f4d1af9148dd
总结
以前使用netty的时候也仅限于和硬件交互,而当时的硬件受限于成本问题是一条一条处理数据包的,所以基本上不会考虑黏包问题
然后就是ByteToMessageDecoder和MessageToByteEncoder两个类是比较底层实现数据流处理的,并没有带有拆包黏包的处理机制,需要自己在数据包头规定包的长度,而且无法处理过大的数据包,因为我一开始首先使用了这种方式处理数据,所以后来就没有再换成DelimiterBasedFrameDecoder加 StringDecoder来解析数据包,最后使用json直接转化为对象。
编码/解码
ReplayingDecoder
ReplayingDecoder的原理
ReplayingDecoder继承了ByteToMessageDecoder,但是使用ReplayingDecoder的好处在于:ReplayingDecoder在处理数据时可以认为所有的数据(ByteBuf) 已经接收完毕,而不用判断接收数据的长度。
|
|
ReplayingDecoder使用了特殊的ByteBuf:ReplayingDecoderByteBuf,当数据不够时会抛出一类特殊的错误,然后ReplayingDecoder会重置readerIndex并且再次调用decode方法。- 泛型
<S>使用 枚举Enum来表示状态,其内部存在状态管理。如果是无状态的,则使用Void。
继承基类ByteToMessageDecoder的方式
下面是一个用来解码带有长整型(Long)数据头head的解码器:
|
|
从以上代码可以看出,在decode方法中需要对数据的长度做判断,依据ByteBuf的readerIndex来获取真实数据,逻辑比较复杂。
继承基类ReplayingDecoder的方式
如果以上的例子选择继承ReplayingDecoder,那逻辑会非常简单。由于不存在状态管理,所以泛型使用Void。
|
|
状态管理和checkpoint方法
状态可以使用枚举Enum来表示,如:
|
|
当调用checkpoint(MyDecoderState state)时,ReplayingDecoder会将当前readerIndex赋值给int类型的成员变量checkpoint,在后续数据读取过程中方便重置。
|
|
使用状态管理后的LongHeaderFrameDecoder:
|
|
一、设计模式为啥老是用不好?
想要写出更屌的代码,提高代码的健壮性和可扩展性,那么设计模式可谓是必学的技能。
关于学习设计模式,大家可能都觉得设计模式的概念太过于抽象,理解起来有点费劲;又或者看的时候是理解了,但是写起代码时,却毫无头绪,压根不知道可以套用哪个设计模式。
对,可以看到我使用了 “套” 这个字眼,正是因为我们无法深入理解设计模式的设计理念和使用场景,所以我们往往是想让我们的代码套用设计模式,而不理会业务场景是否合适。
关于设计模式的学习,我不会推荐任何书,因为我自己也没看过,哈哈哈。我看过的是龙哥的设计模式系列文章,里面的文章不但会介绍设计模式的概念,也会用非常有趣的场景去讲解设计模式的设计理念,下面先分享一波链接:龙哥设计模式全集。
对于我自己而言,关于设计模式的使用,除非是非常深刻的理解了,又或者某种设计模式的使用场景非常的清晰明确(例如创建型设计模式中的单例模式、结构型设计模式中的组合模式、行为型设计模式中的策略模式等等),不然我也不知道该如何使用,和什么时候使用。
二、在阅读开源框架源码中学习设计模式!
想学习设计模式的使用方式,何不研究一下各大优秀的开源框架的源码。
想更深层次的理解设计模式,往往阅读优秀的框架和中间件的源码是非常好的方式。优秀的开源框架和中间件,里面都使用了大量的设计模式,使得框架的实用性、可扩展性和性能非常的高。
很巧,今天在工作的空余时间中,我继续阅读一本关于并发的书,并看到关于 Netty 的内置解码器,其中最常用的有 ReplayingDecoder,它是 ByteToMessageDecoder 的子类,作用是: 在读取ByteBuf缓冲区的数据之前,需要检查缓冲区是否有足够的字节;若ByteBuf中有足够的字节,则会正常读取;反之,如果没有足够的字节,则会停止解码。
它是如何做到自主控制解码的时机的呢?其实底层是使用了 ReplayingDecoderByteBuf 这个继承于 ByteBuf 的实现类。而它使用了装饰器设计模式。
1、在 Netty 中如何自定义实现整数解码器?
1.1、ByteToMessageDecoder:
我们需要自定义类需要继承 ByteToMessageDecoder 抽象类,然后重写 decode 方法即可。
看代码:
|
|
我们可以看到非常的简单,就是不断地判断缓冲区里的的可读字节数是否大于等于4(Java 中整数的大小);如果是的话就读取4个字节大小的内容,然后放到结果集里面。
1.2、ReplayingDecoder:
我们需要自定义类需要继承 ReplayingDecoder 类,然后重写 decode 方法即可。
看代码:
|
|
这个实现更加简单,那就是去掉判断,直接调用 ByteBuf 的 readInt() 方法去获取整数即可。
1.3、测试用例:
1.3.1、自定义业务处理器:
先创建一个业务处理器 IntegerProcessHandler,用于处理上面的自定义解码器解码之后的 Java Integer 整数。其功能是:读取上一站的入站数据,把它转换成整数,并且输出到Console控制台上。
码如下:
|
|
这个业务处理器非常的简单,直接继承 ChannelInBoundHandlerAdapter,然户重写 channelRead() 方法即可。
1.3.2、利用 EmbeddedChannel 进行测试:
为了测试入站处理器,需要确保通道能接收到 ByteBuf 入站数据。这里调用 writeInbound 方法,模拟入站数据的写入,向嵌入式通道 EmbeddedChannel 写入100次 ByteBuf 入站缓冲;每一次写入仅仅包含一个整数。
EmbeddedChannel 的 writeInbound 方法模拟入站数据,会被流水线上的两个入站处理器所接收和处理。接着,这些入站的二进制字节被解码成一个一个的整数,然后逐个地输出到控制台上。
看代码:
|
|
通过测试,两个自定义 Decoder 都是没问题的。而他们的最大不同点在于:继承抽象类 ByteToMessageDecoder 的解码器需要判断可读字节数是否大于等于4,大于等于才可以读取一个整数出来;而继承 ReplayingDecoder 的解码器直接调用 readInt() 方法即可。
2、解读 ReplayingDecoder 的原理
其实其中的原理非常的简单,我们可以直接从 ReplayingDecoder 的源码入手:
2.1、ReplayingDecoder的构造函数:
首先是构造函数,此处我们用了无参构造函数:
|
|
我们可以看到,主要是初始化了 ReplayingDecoderByteBuf(其实就是加了点料的 ByteBuf)、checkpoint(读指针下标) 和 state。我们这篇文章不需要理会 state 属性,这个属性是稍微高级一点的用法。 我们最需要关注的是 ReplayingDecoderByteBuf 这个类。
2.2、继续探讨 ReplayingDecoderByteBuf:
那么接下来看看 ReplayingDecoderByteBuf 的源码。
2.2.1、ReplayingDecoderByteBuf 的属性:
|
|
我们可以看到,它继承了 ByteBuf 抽象类,并且里面包含一个 ByteBuf 类型的 buffer 属性,剩余的其他属性暂时不需要看懂。
2.2.2、瞧一瞧 readInt() 方法:
那么接下来,我们就是直接看 ReplayingDecoderByteBuf 的 readInt() 方法了,因为我们知道,在上面的自定义解码器 MyIntegerDecoder2 的 decode() 方法中,只需要直接调用 ByteBuf(也就是 ReplayingDecoderByteBuf) 的 readInt() 方法即可解码一个整数。
|
|
readInt() 方法非常简单,首先是调用 checkReadableBytes() 方法,并且传入 4。根据方法名,我们就可以猜到,先判断缓冲区中是否有4个可读字节;如果是的话,就调用 buffer 的 readInt() 方法,读取一个整数。
2.2.3、继续看看 checkReadableBytes() 方法:
代码如下:
|
|
方法非常简单,其实和我们上面的 MyIntegerDecoder 一样,就是判断缓冲区中是否有 4个字节的可读数据,如果不是的话,则抛出异常。
2.2.4、Signal 异常:
而我们最需要关注的就是这个异常,这个异常是 ReplayingDecoder 的静态成员变量。它是继承了 error 的异常类,是 netty 提供配合 ReplayingDecoder 一起使用的。
至于如何使用,我们可以看到 ReplayingDecoder 的 callDecode() 方法:
|
|
到这里,我们可以捋一下思路:
- 当缓冲区数据流到继承 ReplayingDecoder 的解码器时,会先判断结果集是否有数据,如果有则流入到下一个 InBoundChannel;
- 接着会调用自定义解码器的 decode() 方法,而这里就是是直接调用 ByteBuf 的 readInt() 方法,即 ReplayingDecoderByteBuf 的 readInt() 方法;里面会先判断可读字节大小是否大于 4,如果大于则读取,否则抛出 Signal 这个 Error 类型的异常。
- 如果 ReplayingDecoder 捕捉 Signal 这个异常,会先判断 checkpoint(即读指针下标不) 是否为零,如果不是则重新设置读指针下标,然后跳出读循环。
ReplayingDecoder 能做到自主控制解码的时机,是因为使用 ReplayingDecoderByteBuf 对 ByteBuf 进行修饰,在调用 ByteBuf 的方法前,会先调用自己的判断逻辑,这也就是我们常说的装饰器模式。
三、装饰器模式的特点
首先,被装饰的类和装饰类都是继承同一个类(抽象类)或实现同一个接口。
接着,被装饰类会作为装饰类的成员变量。
最后,在执行被装饰类的方法前后,可能会调用装饰类的方法。
场景总结:
装饰器模式常用于这么一个场景:在不修改类的状态(属性或行为)下,对类的功能进行扩展!
当然啦,这是我自己个人的总结,大家可去阅读专业的书籍来证实这是否正确。如果有更好的总结,可以留言给我,让我也学习学习~
OneToOneEncoder

- 原文作者:知识铺
- 原文链接:https://geek.zshipu.com/post/netty/netty-learning/ch5-handler/
- 版权声明:本作品采用知识共享署名-非商业性使用-禁止演绎 4.0 国际许可协议进行许可,非商业转载请注明出处(作者,原文链接),商业转载请联系作者获得授权。
- 免责声明:本页面内容均来源于站内编辑发布,部分信息来源互联网,并不意味着本站赞同其观点或者证实其内容的真实性,如涉及版权等问题,请立即联系客服进行更改或删除,保证您的合法权益。转载请注明来源,欢迎对文章中的引用来源进行考证,欢迎指出任何有错误或不够清晰的表达。也可以邮件至 sblig@126.com