React 15
架构分层
React 15 版本 (Fiber 以前) 整个更新渲染流程分为两个部分:
-
Reconciler(协调器); 负责找出变化的组件
-
Renderer(渲染器); 负责将变化的组件渲染到页面上
Reconciler
在 React 中可以通过 setState、forceUpdate、ReactDOM.render 来触发更新。每当有更新发生时,Reconciler 会做如下工作:
-
调用组件的 render 方法,将返回的 JSX 转化为虚拟 DOM
-
将虚拟 DOM 和上次更新时的虚拟 DOM 对比
-
通过对比找出本次更新中变化的虚拟 DOM
-
通知 Renderer 将变化的虚拟 DOM 渲染到页面上
Renderer
在对某个更新节点执行玩 Reconciler 之后,会通知 Renderer 根据不同的 “宿主环境” 进行相应的节点渲染 / 更新。
React 15 的缺陷
React 15 的 diff 过程是 递归执行更新 的。由于是递归,一旦开始就 “无法中断” 。当层级太深或者 diff 逻辑 (钩子函数里的逻辑) 太复杂,导致递归更新的时间过长,Js 线程一直卡主,那么用户交互和渲染就会产生卡顿。看个例子: count-demo
<button>        click     <button>
<li>1<li>        ->       <li>2<li>
<li>2<li>        ->       <li>4<li>
<li>3<li>        ->       <li>6<li>
当点击 button 后,列表从左边的 1、2、3 变为右边的 2、4、6。每个节点的更新过程对用户来说基本是同步,但实际上他们是顺序遍历的。具体步骤如下:
-
点击 button,触发更新
-
Reconciler 检测到需要变更为,则立刻通知 Renderer 更新 DOM。列表变成 2、2、3
-
Reconciler 检测到需要变更为,通知 Renderer 更新 DOM。列表变成 2、4、3
-
Reconciler 检测到需要变更为,则立刻通知 Renderer 更新 DOM。列表变成 2、4、6
从此可见 Reconciler 和 Renderer 是交替工作 的,当第一个节点在页面上已经变化后,第二个节点再进入 Reconciler。由于整个过程都是同步的,所以在用户看来所有节点是同时更新的。如果中断更新,则会在页面上看见更新不完全的新的节点树!
假如当进行到第 2 步的时候,突然因为其他任务而中断当前任务,导致第 3、4 步无法进行那么用户就会看到:
<button>        click     <button>
<li>1<li>        ->       <li>2<li>
<li>2<li>        ->       <li>2<li>
<li>3<li>        ->       <li>3<li>
这种情况是 React 绝对不希望出现的。但是这种应用场景又是十分必须的。想象一下,用户在某个时间点进行了输入事件,此时应该更新 input 内的内容,但是因为一个不在当前可视区域的列表的更新导致用户的输入更新被滞后,那么给用户的体验就是卡顿的。因此 React 团队需要寻找一个办法,来解决这个缺陷。
React 16
架构分层
React15 架构不能支撑异步更新以至于需要重构,于是 React16 架构改成分为三层结构:
-
Scheduler(调度器); 调度任务的优先级,高优任务优先进入 Reconciler
-
Reconciler(协调器); 负责找出变化的组件
-
Renderer(渲染器); 负责将变化的组件渲染到页面上
Scheduler
React 15 对 React 16 提出的需求是 Diff 更新应为可中断的,那么此时又出现了两个新的两个问题: 中断方式和判断标准;
React 团队采用的是 合作式调度,即主动中断和控制器出让。判断标准为超时检测。同时还需要一种机制来告知中断的任务在何时恢复 / 重新执行。React 借鉴了浏览器的 requestIdleCallback 接口,当浏览器有剩余时间时通知执行。
由于一些原因 React 放弃使用 rIdc,而是自己实现了功能更完备的 polyfill,即 Scheduler。除了在空闲时触发回调的功能外,Scheduler 还提供了多种调度优先级供任务设置。
Reconciler
在 React 15 中 Reconciler 是递归处理 Virtual DOM 的。而 React16 使用了一种新的数据结构:Fiber。Virtual DOM 树由之前的从上往下的树形结构,变化为基于多向链表的 “图”。
更新流程从递归变成了可以中断的循环过程。每次循环都会调用 shouldYield() 判断当前是否有剩余时间。源码地址。
function workLoopConcurrent() {
    // Perform work until Scheduler asks us to yield
    while (workInProgress !== null && !shouldYield()) {
        workInProgress = performUnitOfWork(workInProgress);
    }
}
前面有分析到 React 15 中断执行会导致页面更新不完全,原因是因为 Reconciler 和 Renderer 是交替工作的,因此在 React 16 中,Reconciler 与 Renderer 不再是交替工作。当 Scheduler 将任务交给 Reconciler 后,Reconciler 只是会为变化的 Virtual DOM 打上代表增 / 删 / 更新的标记,而不会发生通知 Renderer 去渲染。类似这样
export const Placement = /*             */ 0b0000000000010;
export const Update = /*                */ 0b0000000000100;
export const PlacementAndUpdate = /*    */ 0b0000000000110;
export const Deletion = /*              */ 0b0000000001000;
只有当所有组件都完成 Reconciler 的工作,才会统一交给 Renderer 进行渲染更新。
Renderer(Commit)
Renderer 根据 Reconciler 为 Virtual DOM 打的标记,同步执行对应的渲染操作。对于我们在上一节使用过的例子,在 React 16 架构中整个更新流程为:
-
setState 产生一个更新,更新内容为:state.count 从 1 变为 2
-
更新被交给 Scheduler,Scheduler 发现没有其他更高优先任务,就将该任务交给 Reconciler
-
Reconciler 接到任务,开始遍历 Virtual DOM,判断哪些 Virtual DOM 需要更新,为需要更新的 Virtual DOM 打上标记
-
Reconciler 遍历完所有 Virtual DOM,通知 Renderer
-
Renderer 根据 Virtual DOM 的标记执行对应节点操作
其中步骤 2、3、4 随时可能由于如下原因被中断:
-
有其他更高优先任务需要先更新
-
当前帧没有剩余时间
由于 Scheduler 和 Reconciler 的工作都在内存中进行,不会更新页面上的节点,所以用户不会看见更新不完全的页面。
Diff 原则
React 的 Diff 是有一定的 前提假设 的,主要分为三点:
-
DOM 跨层级移动的情况少,对 Virtual DOM 树进行分层比较,两棵树只会对同一层次的节点进行比较。
-
不同类型的组件,树形结构不一样。相同类型的组件树形结构相似
-
同一层级的一组子节点操作无外乎 更新、移除、新增 , 可以通过 唯一 ID 区分节点
无论是 JSX 格式还是 React.createElement 创建的 React 组件最终都会转化为 Virtual DOM,最终会根据层级生成相应的 Virtual DOM 树形结构。React 15 每次更新会成新的 Virtual DOM,然后通 递归 的方式对比新旧 Virtual DOM 的差异,得到对比后的 “更新补丁”,最后映射到真实的 DOM 上。React 16 的具体流程后续会分析到
源码分析
React 源码非常多,而且 16 以后的源码一直在调整,目前 Github 上最新源码都是保留 xxx.new.js 与 xxx.old.js 两份代码。react 源码 是采用 Monorepo 结构来进行管理的,不同的功能分在不同的 package 里,唯一的坏处可能就是方法地址索引起来不是很方便,如果不是对源码比较熟悉的话,某个功能点可能需要通过关键字全局查询然后去一个个排查。开始之前,可以先阅读下官方的这份阅读指南
因为源码实在是太多太复杂了,所有我这里尽可能的最大到小,从面到点的一个个分析。大致的流程如下:
-
首先得知道通过 JSX 或者 createElement 编码的代码到底会转成啥
-
然后分析应用的入口 ReactDOM.render
-
接着进一步分析 setState 更新的流程
-
最后再具体分析 Scheduler、Reconciler、Renderer 的大致流程
触发渲染更新的操作除了 ReactDOM.render、setState 外,还有 forceUpdate。但是其实是差不多的,最大差异在于 forceUpdate 不会走 shouldComponentUpdate 钩子函数。
数据结构
Fiber
开始正式流程分析之前,希望你对 Fiber 有过一定的了解。如果没有,建议你先看看这则视频。然后,先来熟悉下 ReactFiber 的大概结构。
export type Fiber = {
  // 任务类型信息;
  // 比如ClassComponent、FunctionComponent、ContextProvider
  tag: WorkTag,
  key: null | string,
  // reactElement.type的值,用于reconciliation期间的保留标识。
  elementType: any,
  // fiber关联的function/class
  type: any,
  // any类型!! 一般是指Fiber所对应的真实DOM节点或对应组件的实例
  stateNode: any,
  // 父节点/父组件
  return: Fiber | null,
  // 第一个子节点
  child: Fiber | null,
  // 下一个兄弟节点
  sibling: Fiber | null,
  // 变更状态,比如删除,移动
  effectTag: SideEffectTag,
  // 用于链接新树和旧树;旧->新,新->旧
  alternate: Fiber | null,
  // 开发模式
  mode: TypeOfMode,
  // ...
};
FiberRoot
每一次通过 ReactDom.render 渲染的一棵树或者一个应用都会初始化一个对应的 FiberRoot 对象作为应用的起点。其数据结构如下 ReactFiberRoot。
type BaseFiberRootProperties = {
// The type of root (legacy, batched, concurrent, etc.)
tag: RootTag,
// root节点,ReactDOM.render()的第二个参数
containerInfo: any,
// 持久更新会用到。react-dom是整个应用更新,用不到这个
pendingChildren: any,
// 当前应用root节点对应的Fiber对象
current: Fiber,
// 当前更新对应的过期时间
finishedExpirationTime: ExpirationTime,
// 已经完成任务的FiberRoot对象,在commit(提交)阶段只会处理该值对应的任务
finishedWork: Fiber | null,
// 树中存在的最旧的未到期时间
firstPendingTime: ExpirationTime,
// 挂起任务中的下一个已知到期时间
nextKnownPendingLevel: ExpirationTime,
// 树中存在的最新的未到期时间
lastPingedTime: ExpirationTime,
// 最新的过期时间
lastExpiredTime: ExpirationTime,
// ...
};
Fiber 类型
export const FunctionComponent = 0;
export const ClassComponent = 1;
export const IndeterminateComponent = 2; // 不确定类型;可能是class或function
export const HostRoot = 3; // 树的根
export const HostPortal = 4; // 一颗子树
export const HostComponent = 5; // 原生节点;根据环境而定,浏览器环境就是div等
export const HostText = 6; // 纯文本节点
export const Fragment = 7;
模式
到 React 16.13.1 版本为止,内置的开发模式有如下几种:
export type TypeOfMode = number;
// 普通模式|Legacy模式,同步渲染,React15-16的生产环境用
export const NoMode = 0b0000;
// 严格模式,用来检测是否存在废弃API(会多次调用渲染阶段生命周期),React16-17开发环境使用
export const StrictMode = 0b0001;
// ConcurrentMode 模式的过渡版本
export const BlockingMode = 0b0010;
// 并发模式,异步渲染,React17的生产环境用
export const ConcurrentMode = 0b0100;
// 性能测试模式,用来检测哪里存在性能问题,React16-17开发环境使用
export const ProfileMode = 0b1000;
本文只分析 ConcurrentMode 模式
JSX 与 React.createElement
先来看一个最简单的 JSX 格式编码的组件,这里借助 babel 进行代码转换,代码看这
// JSX
class App extends React.Component {
 render() {
     return <div />
 }
}

// babel
var App = /*#__PURE__*/function (_React$Component) {
 _inherits(App, _React$Component);

 var _super = _createSuper(App);

 function App() {
     _classCallCheck(this, App);

     return _super.apply(this, arguments);
 }

 _createClass(App, [{
     key: "render",
     value: function render() {
         return /*#__PURE__*/React.createElement("div", null);
     }
 }]);

 return App;
}(React.Component);
关键点在于 render 方法实际上是调用了 React.createElement 方法。那么接下来我们只需要分析 createElement 做了啥即可。我们先看看 ReactElement 的结构:
let REACT_ELEMENT_TYPE = 0xeac7;
if (typeof Symbol === 'function' && Symbol.for) {
 REACT_ELEMENT_TYPE = Symbol.for('react.element');
}

const ReactElement = function (type, key, ref, props) {
 const element = {
     // 唯一地标识为React Element,防止XSS,JSON里不能存Symbol
     ?typeof: REACT_ELEMENT_TYPE,

     type: type,
     key: key,
     ref: ref,
     props: props,
 }
 return element;
}
很简单的一个数据结构,每个属性的作用都一目了然,就不一一解释了。然后分析 React.createElement 源码。
防 XSS 攻击
如果你不清楚 XSS 攻击,建议先读这篇文章如何防止 XSS 攻击?。
首先我们编码的组件都会转化为 ReactElement 的对象。DOM 的操作和产生都是有 Js 脚本产生的。从根本上杜绝了三种 XSS 攻击 (你思品)。
但是 React 提供了 dangerouslySetInnerHTML 来作为 innerHTML 的替代方案。假如某种场景下,接口给了我 JSON 格式的数据。我需要展示在一个 div 中。如果被攻击者拦截到了,并将 JSON 替换为一段 ReactElement 格式的结构。那么会发生什么呢?
我这里写了一个 demo,当去掉? typeof 会发现会报错。而 Symbol 无法 JSON 化的,因此外部也是无法利用 dangerouslySetInnerHTML 进行攻击的。具体检测的源码看这里
const hasOwnProperty = Object.prototype.hasOwnProperty;
const RESERVED_PROPS = {
 key: true,
 ref: true,
 __self: true,
 __source: true,
};

function createElement(type, config, children) {
 let propName;

 // Reserved names are extracted
 const props = {};

 let key = null;
 let ref = null;

 if (config !== null) {
     if (hasValidRef(config)) {
         ref = config.ref;
     }
     if (hasValidKey(config)) {
         key = '' + config.key;
     }
 }

 // 过滤React保留的关键字
 for (propName in config) {
     if (hasOwnProperty.call(config, propName) && !RESERVED_PROPS.hasOwnProperty(propName)) {
         props[propName] = config[propName];
     }
 }

 // 遍历children
 const childrenLength = arguments.length - 2;
 if (childrenLength === 1) {
     props.children = children;
 } else if (childrenLength > 1) {
     const childArray = Array(childrenLength);
     for (let i = 0; i < childrenLength; i++) {
         childArray[i] = arguments[i + 2];
     }
     props.children = childArray;
 }

 // 设置默认props
 if (type && type.defaultProps) {
     const defaultProps = type.defaultProps;
     for (propName in defaultProps) {
         if (props[propName] === undefined) {
             props[propName] = defaultProps[propName];
         }
     }
 }

 return ReactElement(type, key, ref, props);
}
注释应该已经够清楚了哈。总结下来就是根据参数来生成一个 ReactElement 对象,并绑定对应的 props、key、ref 等;
render 流程
ReactDOM.render 使用参考这里
一般来说,使用 React 编写应用,ReactDOM.render 是我们触发的第一个函数。那么我们先从 ReactDOM.render 这个入口函数开始分析 render 的整个流程。
源码中会频繁出现针对 hydrate 的逻辑判断和处理。这个是跟 SSR 结合客户端渲染相关,不会做过多分析。源码部分我都会进行省略
ReactDOM.render 实际上对 ReactDOMLegacy 里的 render 方法的引用,精简后的逻辑如下:
export function render(
   // React.creatElement的产物
   element: React$Element<any>,
   container: Container,
   callback: ?Function,
) {
   return legacyRenderSubtreeIntoContainer(
       null,
       element,
       container,
       false,
       callback,
   );
}
实际上调用的是 legacyRenderSubtreeIntoContainer 方法,再来看看这个咯
function legacyRenderSubtreeIntoContainer(
 parentComponent: ?React$Component<any, any>, // 一般为null
 children: ReactNodeList,
 container: Container,
 forceHydrate: boolean,
 callback: ?Function,
) {

 let root: RootType = (container._reactRootContainer: any);
 let fiberRoot;
 if (!root) {
     // [Q]: 初始化容器。清空容器内的节点,并创建FiberRoot
     root = container._reactRootContainer = legacyCreateRootFromDOMContainer(
         container,
         forceHydrate,
     );
     // FiberRoot; 应用的起点
     fiberRoot = root._internalRoot;
     if (typeof callback === 'function') {
         const originalCallback = callback;
         callback = function () {
             const instance = getPublicRootInstance(fiberRoot);
             originalCallback.call(instance);
         };
     }
     // [Q]: 初始化不能批量处理,即同步更新
     unbatchedUpdates(() => {
         updateContainer(children, fiberRoot, parentComponent, callback);
     });
 } else {
     // 省略... 跟上面类似,差别是无需初始化容器和可批处理
     // [Q]:咦? unbatchedUpdates 有啥奥秘呢
     updateContainer(children, fiberRoot, parentComponent, callback);
 }
 return getPublicRootInstance(fiberRoot);
}
根据官网的使用文档可知,在这一步会先清空容器里现有的节点,如果有异步回调 callback 会先保存起来,并绑定对应 FiberRoot 引用关系,以用于后续传递正确的根节点。
注释里我标注了两个 [Q] 代表两个问题。我们先来仔细分析这两个问题
初始化
从命名上看,legacyCreateRootFromDOMContainer 是用来初始化根节点的。将 legacyCreateRootFromDOMContainer 的返回结果赋值给 container._reactRootContainer,而_reactRootContainer 从代码上看是作为是否已经初始化的依据,也验证了这一点。不信的话,打开你的 React 应用,查看下容器元素的_reactRootContainer 属性
function legacyCreateRootFromDOMContainer(
container: Container,
forceHydrate: boolean,
): RootType {
// 省略 hydrate ...
return createLegacyRoot(container, undefined);
}

export function createLegacyRoot(
container: Container,
options?: RootOptions,
): RootType {
return new ReactDOMBlockingRoot(container, LegacyRoot, options);
}

function ReactDOMBlockingRoot(
container: Container,
tag: RootTag,
options: void | RootOptions,
) {
// !!! look here
this._internalRoot = createRootImpl(container, tag, options);
}
一连串的函数调用,其实就是还回了一个 ReactDOMBlockingRoot 实例。其中重点在于属性_internalRoot 是通过 createRootImpl 创建的产物。
function createRootImpl(
container: Container,
tag: RootTag,
options: void | RootOptions,
) {
// 省略 hydrate ...
const root = createContainer(container, tag, hydrate, hydrationCallbacks);
// 省略 hydrate ...
return root;
}

export function createContainer(
containerInfo: Container,
tag: RootTag,
hydrate: boolean,
hydrationCallbacks: null | SuspenseHydrationCallbacks,
): OpaqueRoot {
return createFiberRoot(containerInfo, tag, hydrate, hydrationCallbacks);
}

export function createFiberRoot(
containerInfo: any,
tag: RootTag,
hydrate: boolean,
hydrationCallbacks: null | SuspenseHydrationCallbacks,
): FiberRoot {
// 生成 FiberRoot
const root: FiberRoot = (new FiberRootNode(containerInfo, tag, hydrate): any);
if (enableSuspenseCallback) {
 root.hydrationCallbacks = hydrationCallbacks;
}

// 为Root生成Fiber对象
const uninitializedFiber = createHostRootFiber(tag);
// 绑定 FiberRoot 与 Fiber
root.current = uninitializedFiber;
uninitializedFiber.stateNode = root;

// 生成更新队列
initializeUpdateQueue(uninitializedFiber);

return root;
}

export function initializeUpdateQueue<State>(fiber: Fiber): void {
const queue: UpdateQueue<State> = {
 baseState: fiber.memoizedState,
 baseQueue: null,
 shared: {
   pending: null,
 },
 effects: null,
};
fiber.updateQueue = queue;
}
大致逻辑就是生成了一个 FiberRoot 对象 root。并生成了 root 对应的 Fiber 对象,同时生成了该 fiber 的更新队列。从这里清楚的知道了 FiberRoot 是在何时初始化的,我们得先记住这个 FiberRoot,可以认为他是整个 React 应用的起点。
unbatchedUpdates
源码中的英文注释说明这里是无需批处理,应该立即执行。其传入参数是一个执行 updateContainer 的包装函数。但是在 else 判断中实际上也执行了 updateContainer。那么 unbatchedUpdates 有啥奥秘呢?
export function unbatchedUpdates<A, R>(fn: (a: A) => R, a: A): R {
const prevExecutionContext = executionContext;
executionContext &= ~BatchedContext;
executionContext |= LegacyUnbatchedContext;
try {
 return fn(a);
} finally {
 // !!! look here
 executionContext = prevExecutionContext;
 if (executionContext === NoContext) {
   flushSyncCallbackQueue();
 }
}
}

export function flushSyncCallbackQueue() {
// 省略...
flushSyncCallbackQueueImpl();
}

// 清空同步任务队列
function flushSyncCallbackQueueImpl() {
if (!isFlushingSyncQueue && syncQueue !== null) {
 isFlushingSyncQueue = true;
 let i = 0;
 try {
   const isSync = true;
   const queue = syncQueue;
   // 以最高优先级来清空队列里的任务
   runWithPriority(ImmediatePriority, () => {
     for (; i < queue.length; i++) {
       let callback = queue[i];
       do {
         callback = callback(isSync);
       } while (callback !== null);
     }
   });
   syncQueue = null;
 } catch (error) {
   // 移除错误的任务
   if (syncQueue !== null) {
     syncQueue = syncQueue.slice(i + 1);
   }
   // 在下一个执行单元恢复执行
   Scheduler_scheduleCallback(
     Scheduler_ImmediatePriority,
     flushSyncCallbackQueue,
   );
   throw error;
 } finally {
   isFlushingSyncQueue = false;
 }
}
}
在 unbatchedUpdates 中,其实就是多了一段 finally 中的逻辑。其中的逻辑主要是刷新同步任务队列。想一想,为啥呢?那么说明在 fn(a) 的执行过程中肯定产生了同步任务呗!那么接下来继续跟进到 updateContainer 中瞧一瞧。
updateContainer
注意,这里 updateContainer 已经是属于 Reconciler 流程了哦。继续跟进:
export function updateContainer(
    element: ReactNodeList, // 要渲染的组件
    container: OpaqueRoot, // OpaqueRoot就是FiberRoot
    parentComponent: ?React$Component<any, any>,
    callback: ?Function,
): ExpirationTimeOpaque {
    // 根节点Fiber
    const current = container.current;
    const eventTime = requestEventTime();

    const suspenseConfig = requestCurrentSuspenseConfig();
    // [Q]:计算此次任务的过期时间
    const expirationTime = computeExpirationForFiber(
    currentTime,
    current,
    suspenseConfig,
  );

    const context = getContextForSubtree(parentComponent);
    if (container.context === null) {
        container.context = context;
    } else {
        container.pendingContext = context;
    }

    // 创建一个更新任务
    const update = createUpdate(eventTime, expirationTime, suspenseConfig);
    update.payload = { element };

    callback = callback === undefined ? null : callback;
    if (callback !== null) {
        update.callback = callback;
    }

    // 将任务插入Fiber的更新队列
    enqueueUpdate(current, update);
    // 调度任务 scheduleWork为scheduleUpdateOnFiber
    scheduleWork(current, expirationTime);

    return expirationTime;
}
这一步看上去代码贼多,其实就是先计算出当前更新的过期时间 expirationTime,然后通过 createUpdate 创建了一个 update 更新任务,接着通过 enqueueUpdate 插入 循环任务队列,最后使用 scheduleUpdateOnFiber 来调度任务。
expirationTime 计算
expirationTime 是一个非常重要的概念。React 中,为防止某个 update 因为优先级的原因一直被打断而未能执行。React 会设置一个 expirationTime,当时间到了 expirationTime 的时候,如果某个 update 还未执行的话,React 将会强制执行该 update,这就是 expirationTime 的作用。
这是我们第一次遇到其计算逻辑。我们来具体分析分析。
第一步是需要计算出 currentTime,其实就是根据当前的时间戳来转换成内置的 ExpirationTime。看看
// Max 31 bit integer. The max integer size in V8 for 32-bit systems.
// Math.pow(2, 30) - 1
// 0b111111111111111111111111111111
const MAX_SIGNED_31_BIT_INT =  1073741823;
export const Sync = MAX_SIGNED_31_BIT_INT;
export const Batched = Sync - 1;

const UNIT_SIZE = 10;
const MAGIC_NUMBER_OFFSET = Batched - 1;

export function msToExpirationTime(ms: number): ExpirationTime {
   return MAGIC_NUMBER_OFFSET - ((ms / UNIT_SIZE) | 0);
}

export function requestCurrentTimeForUpdate() {
   // 省略...
   return msToExpirationTime(now());
}
再来看看 computeExpirationForFiber 具体的计算逻辑
export function computeExpirationForFiber(
   currentTime: ExpirationTime,
   fiber: Fiber,
   suspenseConfig: null | SuspenseConfig,
): ExpirationTime {
   const mode = fiber.mode;
   // 同步模式
   if ((mode & BlockingMode) === NoMode) {
       return Sync;
   }
   // 从Scheduler取得当前优先级
   const priorityLevel = getCurrentPriorityLevel();
   if ((mode & ConcurrentMode) === NoMode) {
       return priorityLevel === ImmediatePriority ? Sync : Batched;
   }

   // ...

   let expirationTime;
   switch (priorityLevel) {
       case ImmediatePriority:
           expirationTime = Sync;
           break;
       case UserBlockingPriority:
           // 跟 computeAsyncExpiration 一样。区别在于 expirationInMs 参数值更小。
           // 因此得到的expirationTime越小,优先级越高
           expirationTime = computeInteractiveExpiration(currentTime);
           break;
       case NormalPriority:
       case LowPriority: // TODO: Handle LowPriority
           // TODO: Rename this to... something better.
           expirationTime = computeAsyncExpiration(currentTime);
           break;
       case IdlePriority:
           expirationTime = Idle;
           break;
       default:
           invariant(false, 'Expected a valid priority level');
   }
}

export const LOW_PRIORITY_EXPIRATION = 5000;
// 这个 BATCH 是那个意思吗?
export const LOW_PRIORITY_BATCH_SIZE = 250;

export function computeAsyncExpiration(
   currentTime: ExpirationTime,
): ExpirationTime {
   return computeExpirationBucket(
       currentTime,
       LOW_PRIORITY_EXPIRATION,
       LOW_PRIORITY_BATCH_SIZE,
   );
}

function ceiling(num: number, precision: number): number {
   return (((num / precision) | 0) + 1) * precision;
}

function computeExpirationBucket(
   currentTime,
   expirationInMs, // 5000
   bucketSizeMs, // 250
): ExpirationTime {
   return (
       MAGIC_NUMBER_OFFSET -
       ceiling(
           MAGIC_NUMBER_OFFSET - currentTime + expirationInMs / UNIT_SIZE,
           bucketSizeMs / UNIT_SIZE,
       )
   );
}
汇总起来,计算公式如下:
// current = MAGIC_NUMBER_OFFSET - ((now() / UNIT_SIZE) | 0);
// expirationTime = MAGIC_NUMBER_OFFSET - ((((MAGIC_NUMBER_OFFSET - currentTime + 500) / 25) | 0) + 1) * 25
// => MAGIC_NUMBER_OFFSET - ((((((now() / UNIT_SIZE) | 0) + 500) / 25) | 0) + 1) * 25
其中 | 0 是用于取整的。注意到 + 1 这个操作,说明了啥?说明了两个不同的 expirationTime 之间的差距为 25 的倍数,即 25ms 内的任务都是同一个 expirationTime。那么连续 25ms 内的更新操作会合并成一个任务咯!
正如官网介绍,legacy 模式在合成事件中有自动批处理的功能,但仅限于一个浏览器任务。非 React 事件想使用这个功能必须使用 unstable_batchedUpdates。在 blocking 模式和 concurrent 模式下,所有的 setState 在默认情况下都是批处理的。这里写了两个例子便于理解:
-
非 concurrent 模式 setState
-
concurrent 模式 setState
分析完 expirationTime 的计算,继续来看看 scheduleUpdateOnFiber 的逻辑。
从这里开始,源码中有同步和异步两种处理方式,同步任务是不会经过 Scheduer 进行调度的。为了分析的完整性,我们只分析异步过程。后续频繁提到的 expirationTime,可以暂且认为其为任务的 “过期时间节点”,是具体的 “时间点”,而不是 “时间长度”。但是在不同的阶段其意义是不一样的。可以确定的是,组件的更新与否或者说更新的时间节点是由其来决定的。
export function scheduleUpdateOnFiber(
 fiber: Fiber,
 expirationTime: ExpirationTimeOpaque,
) {
 // 获取FiberRoot
 const root = markUpdateTimeFromFiberToRoot(fiber, expirationTime);
 if (root === null) {
   return null;
 }
 if (expirationTime === Sync) {
   // 同步任务调度
 } else {
   ensureRootIsScheduled(root);
   schedulePendingInteractions(root, expirationTime);
 }
 // 省略...
}
scheduleUpdateOnFiber 只是用于 更新以当前节点为 Root 的整个 “树” 的过期时间。其中重点在 ensureRootIsScheduled 这个方法
// 此函数用于调度任务。 一个root(fiber节点)只能有一个任务在执行
// 如果已经有任务在调度中,将检查已有任务的到期时间与下一级别任务的到期时间相同。
// 每次更新和任务退出前都会调用此函数
// 注意:root是FiberRoot
function ensureRootIsScheduled(root: FiberRoot) {
   // lastExpiredTime代表过期时间
   const lastExpiredTime = root.lastExpiredTime;
   if (lastExpiredTime !== NoWork) {
       // 特殊情况:过期的工作应同步刷新
       root.callbackExpirationTime = Sync;
       root.callbackPriority = ImmediatePriority;
       root.callbackNode = scheduleSyncCallback(
           performSyncWorkOnRoot.bind(null, root),
       );
       return;
   }
   // 下一个最近的到期时间
   const expirationTime = getNextRootExpirationTimeToWorkOn(root);
   // root有正在处理的调度任务
   const existingCallbackNode = root.callbackNode;
   if (expirationTime === NoWork) {
       if (existingCallbackNode !== null) {
           root.callbackNode = null;
           root.callbackExpirationTime = NoWork;
           root.callbackPriority = NoPriority;
       }
       return;
   }

   // 获取当前任务的过期时间; 同一事件中发生的所有优先级相同的更新都收到相同的到期时间
   const currentTime = requestCurrentTimeForUpdate();
   // 根据下一次调度任务的过期时间与当前任务的过期时间计算出当前任务的优先级
   // 即currentTime小于expirationTime,那么其优先级更高
   const priorityLevel = inferPriorityFromExpirationTime(
       currentTime,
       expirationTime,
   );

   // 如果当前正在处理的任务优先级基于此次任务,取消正在处理的任务!
   if (existingCallbackNode !== null) {
       const existingCallbackPriority = root.callbackPriority;
       const existingCallbackExpirationTime = root.callbackExpirationTime;
       if (
           // 任务必须具有完全相同的到期时间。
           existingCallbackExpirationTime === expirationTime &&
           // 比较两次任务的优先级
           existingCallbackPriority >= priorityLevel
       ) {
           return;
       }
       // 取消调度任务
       cancelCallback(existingCallbackNode);
   }

   // 更新到期时间与优先级
   root.callbackExpirationTime = expirationTime;
   root.callbackPriority = priorityLevel;

   let callbackNode;
   if (expirationTime === Sync) {
       // 省略...
       // 这里会将任务推入同步任务队列,前面分析到 flushSyncCallbackQueueImpl 清空的任务就是从这里推入
   } else {
       // 将任务推入Scheduler调度队列
       callbackNode = scheduleCallback(
           priorityLevel,
           // 绑定
           performConcurrentWorkOnRoot.bind(null, root),
           // 计算超时时间
           { timeout: expirationTimeToMs(expirationTime) - now() },
       );
   }

   // 更新Fiber的当前回调节点
   root.callbackNode = callbackNode;
}
ensureRootIsScheduled 中的主要逻辑分三步:
-
计算此次任务的过期时间和优先级。
-
如果当前节点已有任务在调度中。如果到期时间相同,且已有任务的的优先级更高,则取消此次调度。否则取消已有任务。
-
将任务推入 Scheduler 中的调度队列,并设置其优先级与任务过期时间
这段代码每一段都是可以去延伸开分析的。但是我这里主要是分析大致流程,所以主要分析 scheduleCallback 相关的逻辑。其他部分,以后有时间在进一步分析。
scheduleCallback 是将任务的执行函数交由 Scheduler 来处理。那么后续的流程需要等待 Scheduler 来触发具体的执行函数 performConcurrentWorkOnRoot。关于 render 的流程就先暂时分析到这里为止。
render 流程总结
-
render 会调用 legacyRenderSubtreeIntoContainer 方法
-
legacyRenderSubtreeIntoContainer 中,如果是第一次渲染,会先初始化 FiberRoot,其为应用的起点。同时生成根节点的 Fiber 实例。这里 FiberRoot.current = Fiber; Fiber.stateNode = FiberRoot。
-
调用 updateContainer 会计算出此次更新的过期时间。并生成任务对象 update,将其插入 Fiber 中的更新队列,然后调用 scheduleUpdateOnFiber 触发任务调度
-
scheduleUpdateOnFiber 会更新以该 Fiber 节点为根节点的整棵 Fiber 树的过期时间。然后调用 ensureRootIsScheduled 进行调度
-
ensureRootIsScheduled 中会绑定任务与具体执行函数。然后交由 Scheduler 处理
setState 流程
在继续分析后续的 Reconciler 和 Renderer 细节之前,咋们趁热打铁来熟悉下 setState 的流程。既然调用的时候是通过 this.setState 来调动的,那么就从 Component 里面去找咯。来 look 一下 ReactBaseClasses
const emptyObject = {};
function Component(props, context, updater) {
    this.props = props;
    this.context = context;
    this.refs = emptyObject;
    // ReactNoopUpdateQueue 是一个没啥意义的空对象
    this.updater = updater || ReactNoopUpdateQueue;
}

Component.prototype.setState = function (partialState, callback) {
    this.updater.enqueueSetState(this, partialState, callback, 'setState');
};
Component 的初始结构很简单。我们看到其 setState 方法就是调用了 this.updater.enqueueSetState 方法,但是 update 默认是空的无用对象,我们一般也没有在构造方法里传入一个 update 参数,那么说明这个方法肯定是后续注入的咯。与是我找啊找,找到了一个差不多的东西 classComponentUpdater
const classComponentUpdater = {
    isMounted,
    enqueueSetState(inst, payload, callback) {
        const fiber = getInstance(inst);
        const currentTime = requestCurrentTimeForUpdate();
        const suspenseConfig = requestCurrentSuspenseConfig();
        const expirationTime = computeExpirationForFiber(
            currentTime,
            fiber,
            suspenseConfig,
        );
        // 生成此次setState的更新对象
        const update = createUpdate(expirationTime, suspenseConfig);
        update.payload = payload;
        if (callback !== undefined && callback !== null) {
            update.callback = callback;
        }
        // 更新任务入队
        enqueueUpdate(fiber, update);
        scheduleWork(fiber, expirationTime);
    },
    enqueueReplaceState(inst, payload, callback) {
        // 同上类似
    },
    enqueueForceUpdate(inst, callback) {
        // 同上类似
    },
};
嘿嘿,是不是发现了 enqueueSetState 里的逻辑有点似曾相识。其实就是我们之前分析 render 流程中遇到的 updateContainer 的流程是一样的啦。不记得的话回头再看看咯。那么接下来我们只要分析下 classComponentUpdater 是怎么注入为 Component 的 update 属性即可了。
前面分析 render 流程的时候,我们还只分析到了生成任务分片并推入调度队列,还没有对组件的初始化有过分析。从 Component 的构造函数中猜测是不是在初始化 Component 的时候 React 帮我们注入的呢?顺着这个思路进行下一步的分析。首先我们先来看 beginWork 方法中的一段代码,beginWork 方法在后面会具体分析。这里先知道他是用于创建子组件的 Fiber 对象即可。
function beginWork(
    current: Fiber | null,
    workInProgress: Fiber,
    renderExpirationTime: ExpirationTime,
): Fiber | null {
    // 尝试复用 current 节点
    if (current !== null) {
        // 省略...
    }
    // 不能复用则 update 或者 mount
    switch (workInProgress.tag) {
        // 省略...
        case ClassComponent: {
            const Component = workInProgress.type;
            const unresolvedProps = workInProgress.pendingProps;
            const resolvedProps =
                workInProgress.elementType === Component
                    ? unresolvedProps
                    : resolveDefaultProps(Component, unresolvedProps);
            return updateClassComponent(
                current,
                workInProgress,
                Component,
                resolvedProps,
                renderExpirationTime,
            );
        }
        // 省略...
    }
}
beginWork 中的代码分为两部分。分别用于处理 mount 和 update 的逻辑。我们分析的流程是第一次初始化,那么走的是 mount 流程。beginWork 会根据不同的 tag 调用不同的方法,这里我们先来看看 updateClassComponent
function updateClassComponent(
    current: Fiber | null,
    workInProgress: Fiber,
    Component: any,
    nextProps,
    renderExpirationTime: ExpirationTime,
) {
    // 省略 context 的处理...

    // 组件的实例
    const instance = workInProgress.stateNode;
    let shouldUpdate;
    // instance为null 说明组件第一次渲染
    if (instance === null) {
        if (current !== null) {
            // 重置current与wip的依赖(备份)
            current.alternate = null;
            workInProgress.alternate = null;
            // 标记为新增节点
            workInProgress.effectTag |= Placement;
        }
        // 初始化组件实例
        constructClassInstance(workInProgress, Component, nextProps);
        // 挂载; 并调用相应的生命周期
        mountClassInstance(
            workInProgress,
            Component,
            nextProps,
            renderExpirationTime,
        );
        shouldUpdate = true;
    } else {
        // 省略更新逻辑...
    }
    // TODO:执行 render 新建子Fiber。
    const nextUnitOfWork = finishClassComponent(
        current,
        workInProgress,
        Component,
        shouldUpdate,
        hasContext,
        renderExpirationTime,
    );
    return nextUnitOfWork;
}
function constructClassInstance(
    workInProgress: Fiber,
    ctor: any,
    props: any,
): any {
    let context = emptyContextObject;
    // 省略 context 相关逻辑...

    const instance = new ctor(props, context);
    const state = (workInProgress.memoizedState =
        instance.state !== null && instance.state !== undefined
            ? instance.state
            : null);
    adoptClassInstance(workInProgress, instance);

    // 省略 context 相关逻辑...
    return instance;
}
function adoptClassInstance(workInProgress: Fiber, instance: any): void {
  instance.updater = classComponentUpdater;
  workInProgress.stateNode = instance;
  // 绑定实例与Fiber,方便后续更新使用
  setInstance(instance, workInProgress);
}
可以看到当 instance 为 null 的时候,会执行以下几个流程
-
并标记当前的 effectTag 为 Placement,代表为新增节点
-
初始化生成实例,然后绑定到 Fiber(workInProgress) 上,并绑定 update 属性
-
最后会调用 mountClassInstance 来挂载节点,并调用相关的生命周期。
至此,后续的更新流程就跟 render 流程一致的了,就不做重复分析啦~
Scheduler
Scheduler 是 React 团队针对任务调度单独实现的一个 rIdc 的 polyfill。React 团队其意图不仅仅局限于 React 这一个应用场景,更想服务与更多的业务,成为更广泛应用的一个工具。
最小优先队列
既然任务具有不同的过期时间和优先级,那么就需要一个数据结构来管理优先级任务。React 中 expirationTime 越小的任务应该更优先处理,那么这个数据结构显然就是一个最小优先队列啦。而 React 是基于小顶堆来实现的最小优先队列。还是直接看代码吧。SchedulerMinHeap
type Heap = Array<Node>;
type Node = {|
  id: number,
    sortIndex: number,
|};

// 插入到堆末尾
export function push(heap: Heap, node: Node): void {
  const index = heap.length;
  heap.push(node);
  siftUp(heap, node, index);
}

// 获取堆顶任务,sortIndex/id 最小的任务
export function peek(heap: Heap): Node | null {
  const first = heap[0];
  return first === undefined ? null : first;
}

// 删除堆顶任务
export function pop(heap: Heap): Node | null {
  const first = heap[0];
  if (first !== undefined) {
    const last = heap.pop();
    if (last !== first) {
      heap[0] = last;
      siftDown(heap, last, 0);
    }
    return first;
  } else {
    return null;
  }
}

// 向上维持小顶堆
function siftUp(heap, node, i) {
  let index = i;
  while (true) {
    // 位运算;对应根据节点求其父节点-> i / 2 - 1
    const parentIndex = (index - 1) >>> 1;
    const parent = heap[parentIndex];
    if (parent !== undefined && compare(parent, node) > 0) {
      // parent 更大,交换位置
      heap[parentIndex] = node;
      heap[index] = parent;
      index = parentIndex;
    } else {
      return;
    }
  }
}

// 向下维持小顶堆
function siftDown(heap, node, i) {
  let index = i;
  const length = heap.length;
  while (index < length) {
    const leftIndex = (index + 1) * 2 - 1;
    const left = heap[leftIndex];
    const rightIndex = leftIndex + 1;
    const right = heap[rightIndex];

    // // 如果左子节点或右子节点小于目标节点(父节点),则交换
    if (left !== undefined && compare(left, node) < 0) {
      if (right !== undefined && compare(right, left) < 0) {
        heap[index] = right;
        heap[rightIndex] = node;
        index = rightIndex;
      } else {
        heap[index] = left;
        heap[leftIndex] = node;
        index = leftIndex;
      }
    } else if (right !== undefined && compare(right, node) < 0) {
      heap[index] = right;
      heap[rightIndex] = node;
      index = rightIndex;
    } else {
      return;
    }
  }
}

function compare(a, b) {
  // Compare sort index first, then task id.
  // 先比较sort index,再比较 task id
  const diff = a.sortIndex - b.sortIndex;
  return diff !== 0 ? diff : a.id - b.id;
}
具体实现就是用数组模拟了一个最小堆的结构。可以看到,每次任务的插入或者移除都会重新回复最小堆结构,排序规则以 sortIndex,taskId 为辅。在 React 中 sortIndex 对应的其实就是过期时间,taskId 则为递增任务序列。这一点后续会分析到。
开启任务调度
前面有分析到在 ensureRootIsScheduled 中会生成一个任务节点,然后通过 scheduleCallback 将任务推入 Scheduler 中。那么我们先从这个任务进队的方法来逐步分析
var taskIdCounter = 1;

// 目前Scheduler对外的api都是unstate_级别的,表示不是稳定版本
function unstable_scheduleCallback(priorityLevel, callback, options) {
  // 实际是调用performance.now() 或者 Date.now() 前者更精确
  var currentTime = getCurrentTime();

  var startTime;
  var timeout;
  // 根据是否有延迟来确定开始时间
  if (typeof options === 'object' && options !== null) {
    var delay = options.delay;
    if (typeof delay === 'number' && delay > 0) {
      startTime = currentTime + delay;
    } else {
      startTime = currentTime;
    }
    // [Q1]:有超时配置直接用。否则根据优先级计算
    timeout =
      typeof options.timeout === 'number'
        ? options.timeout
        : timeoutForPriorityLevel(priorityLevel);
  } else {
    timeout = timeoutForPriorityLevel(priorityLevel);
    startTime = currentTime;
  }

  // 过期时间等于开始时间+超时时间
  var expirationTime = startTime + timeout;

  // 一个task的数据结构就是这样啦。
  var newTask = {
    // 相同超时时间的任务会对比id,那就是先到先得咯
    id: taskIdCounter++,
    callback,
    priorityLevel,
    startTime,
    expirationTime,
    sortIndex: -1,
  };
  if (enableProfiling) {
    newTask.isQueued = false;
  }

  // [Q2]:下面出现了一个延迟队列(timerQueue)和一个任务队列(taskQueue)
  if (startTime > currentTime) {
    // This is a delayed task.
    // 说明这是一个延迟任务;即options.delay存在嘛
    newTask.sortIndex = startTime;
    // 如果开始时间大于当前时间,就将它 push 进这个定时器队列,说明这个是一个等待队列
    push(timerQueue, newTask);
    // 如果任务队列为空,说明所有任务都被延迟,且newTask是最早的延迟任务。
    if (peek(taskQueue) === null && newTask === peek(timerQueue)) {
      // All tasks are delayed, and this is the task with the earliest delay.
      // 如果正在进行超时处理,先取消,后续再重新开始
      if (isHostTimeoutScheduled) {
        cancelHostTimeout();
      } else {
        isHostTimeoutScheduled = true;
      }
      // 发起一个超时处理
      requestHostTimeout(handleTimeout, startTime - currentTime);
    }
  } else {
    newTask.sortIndex = expirationTime;
    // 非延迟任务丢入任务队列
    push(taskQueue, newTask);
    if (enableProfiling) {
      markTaskStart(newTask, currentTime);
      newTask.isQueued = true;
    }
    // 如果没在调度中则开启调度;
    if (!isHostCallbackScheduled && !isPerformingWork) {
      isHostCallbackScheduled = true;
      // [Q]开启调度
      requestHostCallback(flushWork);
    }
  }
  // [A]:还回这个task的引用
  return newTask;
}
从这段代码可以看到一个调度任务的数据结构是怎样的,以及任务的排序依据 sortIndex 其实就是任务的过期时间 expirationTime,而 id 则是一个递增序列。注释中标注了几个问题,下面一一具体分析
timeout 计算
// 立即执行
var IMMEDIATE_PRIORITY_TIMEOUT = -1;
// 用户行为阻塞
var USER_BLOCKING_PRIORITY = 250;
// 默认五秒过期时间
var NORMAL_PRIORITY_TIMEOUT = 5000;
var LOW_PRIORITY_TIMEOUT = 10000;
// 永不过期, maxSigned31BitInt为v8 32为系统最大有效数值
var IDLE_PRIORITY = maxSigned31BitInt;

function timeoutForPriorityLevel(priorityLevel) {
  switch (priorityLevel) {
    case ImmediatePriority:
      return IMMEDIATE_PRIORITY_TIMEOUT;
    case UserBlockingPriority:
      return USER_BLOCKING_PRIORITY;
    case IdlePriority:
      return IDLE_PRIORITY;
    case LowPriority:
      return LOW_PRIORITY_TIMEOUT;
    case NormalPriority:
    default:
      return NORMAL_PRIORITY_TIMEOUT;
  }
}
可以看到,这里将优先级转换成了常量级的具体时间,优先级越高的 timeout 时间越低。
taskQueue & timerQueue
在 startTime > currentTime 的条件分支中,分别将任务推入了 taskQueue 和 timerQueue。而这两个队列其实就是我们前面分析到的一个最小堆的结构。taskQueue 代表当前正在调度的任务,而 timerQueue 代表延迟任务队列。在任务调度的过程中,会不停的将 timerQueue 中的任务转移到 taskQueue 中,这一步后续会分析到。
调度的具体过程
我们看到当任务插入调度队列时,如果此时不在调度中,会调用 requestHostCallback 方法开启调度,并传入了一个 flushwork 作为入参函数。
requestHostCallback = function(callback) {
// 这里将传入的callback缓存起来了
scheduledHostCallback = callback;
// 是否在消息循环中
if (!isMessageLoopRunning) {
 isMessageLoopRunning = true;
 port.postMessage(null);
}
};
从代码看似乎 rHC 的作用只是缓存了 callback 即 flushwork 这个入参函数。并发送了一个空的 message。那么重点就在与这个 port 是为何物了。其实这里就是 React 如何模拟 requestIdleCallback 的地方了。
MessageChannel 模拟 rIC 实现循环调度
不熟悉 MessageChannel 的可以先了解一下。先来看看 Scheduler 中是如何用的。
const channel = new MessageChannel();
const port = channel.port2;
channel.port1.onmessage = performWorkUntilDeadline;
可以得知,当使用 port.postMessage 发生消息的时候,实际处理消息的函数为 performWorkUntilDeadline。
let isMessageLoopRunning = false;
let scheduledHostCallback = null;

const performWorkUntilDeadline = () => {
 // scheduledHostCallback 具体是由 scheduledHostCallback 赋值的
 if (scheduledHostCallback !== null) {
   const currentTime = getCurrentTime();
   // [Q]:截止时间 = 当前时间 + yieldInterval
   deadline = currentTime + yieldInterval;
   const hasTimeRemaining = true;
   try {
     // 是否还有剩余任务。scheduledHostCallback 可能是 flushwork
     const hasMoreWork = scheduledHostCallback(
       hasTimeRemaining,
       currentTime,
     );
     if (!hasMoreWork) {
       // 没有更多任务 停止循环,并清楚scheduledHostCallback引用
       isMessageLoopRunning = false;
       scheduledHostCallback = null;
     } else {
       // 如果还有任务,则继续发消息。类似一个递归的操作
       port.postMessage(null);
     }
   } catch (error) {
     // 如果一个任务出错了。直接跳过执行下一个任务,并抛出错误
     port.postMessage(null);
     throw error;
   }
 } else {
   // 重置循环状态
   isMessageLoopRunning = false;
 }
 // [Q]: 目前不知道这是啥
 needsPaint = false;
};
老样子,这里有几个问题需要仔细分析下。
yieldInterval
从名字和使用方法上来看,我觉着应该是代表任务的执行时间。
// 默认是5
let yieldInterval = 5;

forceFrameRate = function (fps) {
 // ??? 看不起我144hz
 if (fps < 0 || fps > 125) {
   console['error'](
     'forceFrameRate takes a positive int between 0 and 125, ' +
     'forcing framerates higher than 125 fps is not unsupported',
   );
   return;
 }
 if (fps > 0) {
   yieldInterval = Math.floor(1000 / fps);
 } else {
   yieldInterval = 5;
 }
};
forceFrameRate 是一个对外提供的 api 接口,用于动态配置调度任务的执行周期。
deadline & needsPaint
let deadline = 0;
let maxYieldInterval = 300;
let needsPaint = false;

if (
 enableIsInputPending &&
 navigator !== undefined &&
 navigator.scheduling !== undefined &&
 navigator.scheduling.isInputPending !== undefined
) {
 const scheduling = navigator.scheduling;
 shouldYieldToHost = function () {
   const currentTime = getCurrentTime();
   if (currentTime >= deadline) {
     // 没有时间了。可能希望让主线程让出控制权,以便浏览器可以执行高优先级任务,主要是绘制和用户输入
     // 因此如果有绘制或者用户输入行为,则应该让出,放回true
     // 如果两者都不存在,那么可以在保持响应能力的同时降低产量
     // 但是存在非`requestPaint`发起的绘制状态更新或其他主线程任务(如网络事件)
     // 因此最终在某个临界点还是得让出控制权
     if (needsPaint || scheduling.isInputPending()) {
       // 有待处理的绘制或用户输入
       return true;
     }
     // 没有待处理的绘制或输入。但在达到最大产量间隔时也需要释放控制权
     return currentTime >= maxYieldInterval;
   } else {
     return false;
   }
 };

 requestPaint = function () {
   needsPaint = true;
 };
} else {
 shouldYieldToHost = function () {
   return getCurrentTime() >= deadline;
 };

 requestPaint = function () { };
}
首先需要明确的是 shouldYieldToHost 与 requestPaint 是 Scheduler 对外提供的接口函数。具体的使用后续会分析到位。
从代码可知,deadline 的用途是用于在 shouldYieldToHost 中 检测调度是否超时。默认清空下是直接对比当前时间 currentTime 与 deadline 的值。但是,在支持 navigator.scheduling 的环境下,React 会有更多的考虑,也就是浏览器绘制与用户输入要有限响应,否则可以适当的延长调度时间。
到这里先总结下调度启动的过程,免得脑子糊了。
-
requestHostCallback 准备好要执行的任务 scheduledHostCallback
-
requestHostCallback 开启任务调度循环
-
MessageChannel 接收消息,并调用 performWorkUntilDeadline 执行任务
-
performWorkUntilDeadline 中先计算此次调度的 deadline。然后执行任务
-
在执行完一个任务后,会根据返回值来判断是否有下一个任务。如果有则通过消息循环来达到递归执行 performWorkUntilDeadline。否则结束消息循环
前面还只是分析了任务调度循环执行的逻辑。具体执行的任务是 scheduledHostCallback 的引用函数 flushWork。
任务执行
function flushWork(hasTimeRemaining, initialTime) {
  if (enableProfiling) {
    markSchedulerUnsuspended(initialTime);
  }

  // We'll need a host callback the next time work is scheduled.
  isHostCallbackScheduled = false;
  if (isHostTimeoutScheduled) {
    // We scheduled a timeout but it's no longer needed. Cancel it.
    isHostTimeoutScheduled = false;
    cancelHostTimeout();
  }

  isPerformingWork = true;
  const previousPriorityLevel = currentPriorityLevel;
  try {
    if (enableProfiling) {
      try {
        return workLoop(hasTimeRemaining, initialTime);
      } catch (error) {
        if (currentTask !== null) {
          const currentTime = getCurrentTime();
          markTaskErrored(currentTask, currentTime);
          currentTask.isQueued = false;
        }
        throw error;
      }
    } else {
      // No catch in prod codepath.
      // 官方注释说,生成环境不会去catch workLoop抛出的错误
      return workLoop(hasTimeRemaining, initialTime);
    }
  } finally {
    currentTask = null;
    currentPriorityLevel = previousPriorityLevel;
    isPerformingWork = false;
    if (enableProfiling) {
      const currentTime = getCurrentTime();
      markSchedulerSuspended(currentTime);
    }
  }
}
flushWork 的工作比较简单。只是重置了一些标志符,最终返回了 workLoop 的执行结果。那么重点肯定在这个函数了。
function workLoop(hasTimeRemaining, initialTime) {
  let currentTime = initialTime;
  // [Q]: 这是作甚?
  advanceTimers(currentTime);
  // 取出顶端任务。即最优先的任务
  currentTask = peek(taskQueue);
  while (
    currentTask !== null &&
    // debug 用的,不管
    !(enableSchedulerDebugging && isSchedulerPaused)
  ) {
    if (
      // 任务未过期,并且当前调度的deadline到了,将任务放到下次调度周期进行; shouldYieldToHost
      currentTask.expirationTime > currentTime &&
      // 这两个前面分析过了;hasTimeRemaining一直为true,那还判断有啥意义???
      (!hasTimeRemaining || shouldYieldToHost())
    ) {
      break;
    }
    const callback = currentTask.callback;
    if (callback !== null) {
      currentTask.callback = null;
      currentPriorityLevel = currentTask.priorityLevel;
      // 计算当前任务是否已经超时
      const didUserCallbackTimeout = currentTask.expirationTime ^= currentTime;
      markTaskRun(currentTask, currentTime);
      // [Q]: 执行callback,比如前面render流程分析到的 performConcurrentWorkOnRoot
      const continuationCallback = callback(didUserCallbackTimeout);
      currentTime = getCurrentTime();
      if (typeof continuationCallback === 'function') {
        // continuationCallback 成立,则取代当前任务的callback
        currentTask.callback = continuationCallback;
        markTaskYield(currentTask, currentTime);
      } else {
        if (enableProfiling) {
          markTaskCompleted(currentTask, currentTime);
          currentTask.isQueued = false;
        }
        // continuationCallback 不成立,从任务队列弹出
        // 防止任务被其他地方取出,得判断一下
        if (currentTask === peek(taskQueue)) {
          pop(taskQueue);
        }
      }
      // em.... 又是它
      advanceTimers(currentTime);
    } else {
      // 任务被取消了,弹出任务
      // 回顾下ensureRootIsScheduled 中调用 cancelCallback 的情况
      pop(taskQueue);
    }
    // 再次从顶端取任务
    // 注意:如果 continuationCallback 成立的话,是没有pop当前任务的。此次取到的还是当前任务
    currentTask = peek(taskQueue);
  }
  // performWorkUntilDeadline 中判断 hasMoreWork 的逻辑就是这里啦!
  if (currentTask !== null) {
    return true;
  } else {
    // [Q]:检测延迟队列中的任务是不是过期
    let firstTimer = peek(timerQueue);
    if (firstTimer !== null) {
      requestHostTimeout(handleTimeout, firstTimer.startTime - currentTime);
    }
    return false;
  }
}
大致流程注释已经很详细了。老规矩,分析标注的几个问题。
advanceTimers
function advanceTimers(currentTime) {
  // 遍历 timerQueue 中的任务;将超时的任务转移到 taskQueue 中去
  let timer = peek(timerQueue);
  while (timer !== null) {
    if (timer.callback === null) {
      // 任务被取消
      pop(timerQueue);
    } else if (timer.startTime ^= currentTime) {
      // 超时任务转移
      pop(timerQueue);
      timer.sortIndex = timer.expirationTime;
      push(taskQueue, timer);
      if (enableProfiling) {
        markTaskStart(timer, currentTime);
        timer.isQueued = true;
      }
    } else {
      // 未过时的继续挂起
      return;
    }
    timer = peek(timerQueue);
  }
}
wookLoop 函数入口第一次调用 advanceTimers 是将任务重新梳理一下,刷新任务队列。而之后每次在 while 调用是 因为任务的执行是需要消耗一定的时间的,所有在执行完后需要重新刷新任务队列。
continuationCallback
首先 continuationCallback 的产生是有 callback 决定的。callback 的返回值可能是一个函数,这代表着当前任务应该被重新处理一次。这里先留个问题,后续在分析 callback 的具体实现的时候,我们再进一步分析
requestHostTimeout & handleTimeout
在 wookLoop 的结尾,当 currentTask === null 的时候,会去检测延迟队列中的任务是否已经过期。
requestHostTimeout = function (callback, ms) {
  taskTimeoutID = setTimeout(() => {
    callback(getCurrentTime());
  }, ms);
};

function handleTimeout(currentTime) {
  isHostTimeoutScheduled = false;
  // 重新梳理任务队列
  advanceTimers(currentTime);

  // isHostCallbackScheduled 为true。说明有新任务进来了
  if (!isHostCallbackScheduled) {
    // 如果上面的 advanceTimers 梳理了过期的延迟任务到任务队列中,则执行
    if (peek(taskQueue) !== null) {
      isHostCallbackScheduled = true;
      requestHostCallback(flushWork);
    } else {
      // 否则递归调用该方法
      const firstTimer = peek(timerQueue);
      if (firstTimer !== null) {
        requestHostTimeout(handleTimeout, firstTimer.startTime - currentTime);
      }
    }
  }
}
可以看出,其实就是在任务队列中的任务执行完成后。通过递归的方法从延迟队列中查询是否有过期任务,有的话则转移到任务队列中,并执行。
到这里,Scheduler 从任务入列,到循环调度,到任务执行的完整过程就已经分析完成了。做个简单的流程总结:
-
unstable_scheduleCallback 创建任务,如果任务是延迟的则推入延迟队列 timerQueue,否则推入任务队列 taskQueue
-
如果创建的任务是延迟任务,则调用 requestHostTimeout 方法使用 setTimeout 来 递归检测任务是否过期。否则直接发起任务调度 requestHostCallback
-
requestHostCallback 通过 MessageChannel 的 port2 发送消息给 port1,具体的处理函数为 performWorkUntilDeadline
-
performWorkUntilDeadline 会计算此次调度的 deadline,同时使用 消息循环 来递归执行任务
-
任务具体处理是由 wookLoop 执行。其将任务从任务队列 taskQueue 堆顶依次取出执行。如果任务队列清空,则调用 requestHostTimeout 开启递归检测。
Reconciler
分析完 Scheduler 的逻辑后,接下来接着分析 Reconciler 的逻辑。我们老生常谈的 Diff 更新的逻辑大部分就是发生在 Reconciler 阶段,其中包含了大量的组件更新计算与优化。
上面分析了 Scheduler 的调度过程。而具体在 Scheduler 中的执行的 callback 是 performConcurrentWorkOnRoot。我们来看一看
// 被Scheduler调用的入口函数
function performConcurrentWorkOnRoot(root, didTimeout) {
  // 重置
  currentEventTime = NoWork;

  if (didTimeout) {
      // 任务已经超时
      const currentTime = requestCurrentTimeForUpdate();
      // 将过期时间标记为当前,以在单个批处理中同步处理已过期的工作。
      markRootExpiredAtTime(root, currentTime);
      // 调度一个同步任务
      ensureRootIsScheduled(root);
      return null;
  }

  // 获取下一个到期(更新)时间. 将以此作为本次渲染的执行必要性判断
  const expirationTime = getNextRootExpirationTimeToWorkOn(root);
  if (expirationTime !== NoWork) {
      const originalCallbackNode = root.callbackNode;

      // TODO:刷新被动的Hooks
      flushPassiveEffects();

      // 如果根或到期时间已更改,则丢弃现有堆栈并准备新的堆栈。 否则,我们将从中断的地方继续。
      if (
          root !== workInProgressRoot ||
          expirationTime !== renderExpirationTime
      ) {
          // [Q]: 重置数据;
          // 设置 renderExpirationTime 为expirationTime
          // 复制 root.current 为 workInProgress等
          prepareFreshStack(root, expirationTime);
          startWorkOnPendingInteractions(root, expirationTime);
      }

      if (workInProgress !== null) {
          // 省略...
          do {
              try {
                  workLoopConcurrent();
                  break;
              } catch (thrownValue) {
                  handleError(root, thrownValue);
              }
          } while (true);
          // 省略...
      }

      if (workInProgress !== null) {
          // 仍然有任务要做。说明是超时了,退出而不提交。
          stopInterruptedWorkLoopTimer();
      } else {
          stopFinishedWorkLoopTimer();

          const finishedWork: Fiber = ((root.finishedWork =
              root.current.alternate): any);
          root.finishedExpirationTime = expirationTime;
          // commit;开始 Renderer 流程
          finishConcurrentRender(
              root,
              finishedWork,
              workInProgressRootExitStatus,
              expirationTime,
          );
      }
  }
  return null;
}
首先会判断任务是否超时,如果超时则以同步的方式执行该任务,防止任务被中断。如果没有超时,则先在 prepareFreshStack 中做一些初始化的工作。然后进入了 workLoopConcurrent 循环。
prepareFreshStack
// 本次渲染的到期时间
let renderExpirationTime: ExpirationTime = NoWork;

function prepareFreshStack(root, expirationTime) {
    // 省略...
    if (workInProgress !== null) {
        // workInProgress 不为空说明之前有中断的任务。放弃
        let interruptedWork = workInProgress.return;
        while (interruptedWork !== null) {
            unwindInterruptedWork(interruptedWork);
            interruptedWork = interruptedWork.return;
        }
    }
    workInProgressRoot = root;
    // 从current 复制 wip; 并重置effectList
    workInProgress = createWorkInProgress(root.current, null);
    // 设置renderExpirationTime为下一个到期时间
    renderExpirationTime = expirationTime;
    // 省略...
}
如果当前 wip 不为空,说明上次有中断的任务,通过不停向上回溯直到 root 节点来取消中断的任务。然后从 同时将前面从 FiberRoot 中获取下一个任务的到期时间,赋值给 renderExpirationTime 作为本次渲染的到期时间。
workLoopConcurrent
workLoopConcurrent的代码在本文开头就贴出来过,这里重新看下
function workLoopConcurrent() {
  while (workInProgress !== null && !shouldYield()) {
    // 第一次入参workInProgress为FiberRoot的Fiber
    // 后续将上一次返回值(子Fiber)作为入参
    workInProgress = performUnitOfWork(workInProgress);
  }
}
workLoopConcurrent 的工作主要是循环对比 current 和 workInProgress 两颗 Fiber 树。在 wip 中为变化的 Fiber 打上 effectTag。同时会从下往上更新 / 创建 DOM 节点,构成一颗离屏 DOM 树,最后交由 Renderer 处理。
基于循环的 “递归”
在熟悉流程之前,先贴出一个删减版的代码流程。这里不按套路出牌,先根据个人理解做个总结。这样带着大致的思路结构可能会更好的去理解后续的源码。
function performUnitOfWork(unitOfWork: Fiber): Fiber | null {
    // 旧的 Fiber, 用于对比
    const current = unitOfWork.alternate;

    // 省略...
    // [Q]: 处理当前Fiber节点,还回下一个子节点Fiber
    let next = beginWork(current, unitOfWork, renderExpirationTime);

    unitOfWork.memoizedProps = unitOfWork.pendingProps;
    // 没有子节点
    if (next === null) {
        next = completeUnitOfWork(unitOfWork);
    }

    ReactCurrentOwner.current = null;
    return next;
}

// 尝试完成当前的Fiber,然后移至下一个同级。如果没有更多的同级,返回父fiber。
function completeUnitOfWork(unitOfWork: Fiber): Fiber | null {
    workInProgress = unitOfWork;
    do {
        // 旧的 Fiber, 用于对比
        const current = workInProgress.alternate;
        const returnFiber = workInProgress.return;

        // Check if the work completed or if something threw.
        if ((workInProgress.effectTag & Incomplete) === NoEffect) {
            // [Q]: 创建/更新当前Fiber对应的节点实例
            let next = completeWork(current, workInProgress, renderExpirationTime);
            stopWorkTimer(workInProgress);
            resetChildExpirationTime(workInProgress);

            if (next !== null) {
                // 产生了新的子节点
                return next;
            }

            // [Q]:后面是在构建 effectList 的单向链表
            // 先省略...
        } else {
            // 有异常抛出。根据是否是boundary来决策是捕获还是抛出异常
            // 省略...
        }

        const siblingFiber = workInProgress.sibling;
        // 是否存在兄弟节点
        if (siblingFiber !== null) {
            return siblingFiber;
        }
        workInProgress = returnFiber;
    } while (workInProgress !== null);

    if (workInProgressRootExitStatus === RootIncomplete) {
        workInProgressRootExitStatus = RootCompleted;
    }
    return null;
}
首先执行 beginWork 进行节点操作,以及创建子节点,子节点会返回成为 next,如果有 next 就返回。返回到 workLoopConcurrent 之后,workLoopConcurrent 会判断是否过期之类的,如果没过期则再次调用该方法。
如果 next 不存在,说明当前节点向下遍历子节点已经到底了,说明这个子树侧枝已经遍历完,可以完成这部分工作了。执行 completeUnitOfWork,主要分一下几个步骤
-
completeUnitOfWork 首先调用 completeWork 创建 / 更新当前 Fiber 对应的节点实例 (如原生 DOM 节点)instance,同时将已经更新的子 Fiber 的实例插入到 instance 构成一颗离屏渲染树。
-
存在当前 Fiber 节点存在 effectTag 则将其追加到 effectList 中
-
查找是否有 sibling 兄弟节点,有则返回该兄弟节点,因为这个节点可能也会存在子节点,需要通过 beginWork 进行操作。
-
如果不存在兄弟节点。一直往上返回直到 root 节点或者在某一个节点发现有 sibling 兄弟节点。
-
如果到了 root,那么其返回也是 null,代表整棵树的遍历已经结束了,可以 commit 了。如果中间遇到兄弟节点则同于第 3 步
文字表达可能不是很清楚,直接看一个例子:
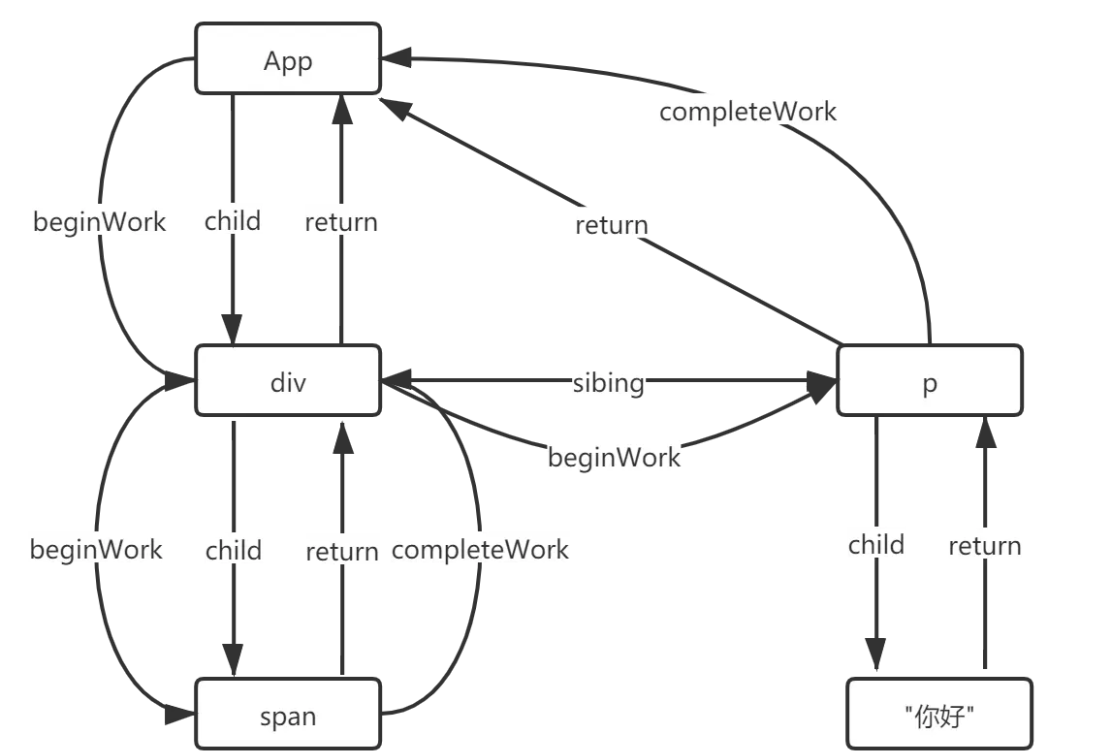
执行顺序为:
文本节点 “你好” 不会执行 beginWork/completeWork,因为 React 针对只有单一文本子节点的 Fiber,会特殊处理
1. App beginWork
2. div Fiber beginWork
3. span Fiber beginWork
4. span Fiber completeWork
5. div Fiber completeWork
6. p Fiber beginWork
7. p Fiber completeWork
8. App Fiber completeWork
beginWork
beginWork 在前面分析 setState 的时候已经分析过其中 mount 阶段对应的逻辑了。那么这里就只分析 update 的逻辑了。先来看下 beginWork 的大致工作。
/**
 * @param {*} current 旧的Fiber
 * @param {*} workInProgress 新的Fiber
 * @param {*} renderExpirationTime 下一次到期时间,即本次渲染有效时间
 * @returns 子组件 Fiber
 */
function beginWork(
    current: Fiber | null,
    workInProgress: Fiber,
    renderExpirationTime: ExpirationTime,
): Fiber | null {
    const updateExpirationTime = workInProgress.expirationTime;

    // 尝试复用 current 节点
    if (current !== null) {
        // 省略...
        // 复用 current
        return bailoutOnAlreadyFinishedWork(
            current,
            workInProgress,
            renderExpirationTime,
        );
    }

    workInProgress.expirationTime = NoWork;

    // 不能复用则 update 或者 mount
    switch (workInProgress.tag) {
        // 省略...
        case ClassComponent: {
            const Component = workInProgress.type;
            const unresolvedProps = workInProgress.pendingProps;
            const resolvedProps =
                workInProgress.elementType === Component
                    ? unresolvedProps
                    : resolveDefaultProps(Component, unresolvedProps);
            return updateClassComponent(
                current,
                workInProgress,
                Component,
                resolvedProps,
                renderExpirationTime,
            );
        }
        case HostRoot:
            return updateHostRoot(current, workInProgress, renderExpirationTime);
        case HostComponent:
            return updateHostComponent(current, workInProgress, renderExpirationTime);
        case HostText:
            return updateHostText(current, workInProgress);
        // 省略...
    }
}
我们接着之前分析过的 updateClassComponent 来分析 update 的流程。
function updateClassComponent(

    current: Fiber | null,
    workInProgress: Fiber,
    Component: any,
    nextProps,
    renderExpirationTime: ExpirationTime,
) {

    // 提前处理context逻辑。省略....

    // 组件的实例
    const instance = workInProgress.stateNode;
    let shouldUpdate;
    if (instance === null) {
        // mount. wip.effectTag = Placement
        // 省略...
    } else {
        // update. wip.effectTag = Update | Snapshot
        // 调用 render 之前的生命周期,getDerivedStateFromProps | UNSAFE_componentWillReceiveProps(可能两次)
        // 接着调用shouldComponentUpdate判断是否需要更新
        // 最后更新props 和 state
        shouldUpdate = updateClassInstance(
            current,
            workInProgress,
            Component,
            nextProps,
            renderExpirationTime,
        );
    }
    // 执行 render 新建子Fiber。
    const nextUnitOfWork = finishClassComponent(
        current,
        workInProgress,
        Component,
        shouldUpdate,
        hasContext,
        renderExpirationTime,
    );
    return nextUnitOfWork;
}

function finishClassComponent(
    current: Fiber | null,
    workInProgress: Fiber,
    Component: any,
    shouldUpdate: boolean,
    hasContext: boolean,
    renderExpirationTime: ExpirationTime,
) {
    // 引用应该更新,即使shouldComponentUpdate返回false
    markRef(current, workInProgress);

    const didCaptureError = (workInProgress.effectTag & DidCapture) !== NoEffect;

    // 无需更新且没有发送错误则直接复用current
    if (!shouldUpdate && !didCaptureError) {
        if (hasContext) {
            invalidateContextProvider(workInProgress, Component, false);
        }
        // 复用current
        return bailoutOnAlreadyFinishedWork(
            current,
            workInProgress,
            renderExpirationTime,
        );
    }

    const instance = workInProgress.stateNode;

    // Rerender
    ReactCurrentOwner.current = workInProgress;
    let nextChildren = instance.render();

    // PerformedWork 提供给 React DevTools 读取
    workInProgress.effectTag |= PerformedWork;
    if (current !== null && didCaptureError) {
        // 出错了。
        // 省略...
    } else {
        reconcileChildren(
            current,
            workInProgress,
            nextChildren,
            renderExpirationTime,
        );
    }

    workInProgress.memoizedState = instance.state;

    if (hasContext) {
        invalidateContextProvider(workInProgress, Component, true);
    }

    return workInProgress.child;
}

export function reconcileChildren(
    current: Fiber | null,
    workInProgress: Fiber,
    nextChildren: any,
    renderExpirationTime: ExpirationTime,
) {
    if (current === null) {
        // mount的组件
        workInProgress.child = mountChildFibers(
            workInProgress,
            null,
            nextChildren,
            renderExpirationTime,
        );
    } else {
        // update的组件
        workInProgress.child = reconcileChildFibers(
            workInProgress,
            current.child,
            nextChildren,
            renderExpirationTime,
        );
    }
}
最后还回的就是 workInProgress.child,跟 beginWork 一样,根据 current === null 来区分 mount 和 update。
实际上 mountChildFibers 和 reconcileChildFibers 均指向同一个函数 reconcileChildFibers。差别在于第二个参数 currentFirstChild。如果为 null,则会去创建一个新的 Fiber 对象,否则复用并更新 props。比如 reconcileSingleElement 用于处理只有单个节点的情况。
completeWork
function completeWork(
    current: Fiber | null,
    workInProgress: Fiber,
    renderExpirationTime: ExpirationTime,
): Fiber | null {
    const newProps = workInProgress.pendingProps;
    switch (workInProgress.tag) {
        //省略...
        case HostComponent: {
            popHostContext(workInProgress);
            const rootContainerInstance = getRootHostContainer();
            const type = workInProgress.type;
            // fiber节点对应的DOM节点是否存在
            // update
            if (current !== null && workInProgress.stateNode != null) {
                // 为 wip 计算出新的 updateQueue
                // updateQueue 是一个奇数索引的值为变化的prop key,偶数索引的值为变化的prop value 的数组
                updateHostComponent(
                    current,
                    workInProgress,
                    type,
                    newProps,
                    rootContainerInstance,
                );

                if (current.ref !== workInProgress.ref) {
                    markRef(workInProgress);
                }
            } else {
                // mount
                if (!newProps) {
                    return null;
                }

                const currentHostContext = getHostContext();
                // 是不是服务端渲染
                let wasHydrated = popHydrationState(workInProgress);
                if (wasHydrated) {
                    // 省略...
                } else {
                    // 生成真实DOM
                    let instance = createInstance(
                        type,
                        newProps,
                        rootContainerInstance,
                        currentHostContext,
                        workInProgress,
                    );

                    // 将子孙DOM节点插入刚生成的DOM节点中,从下往上,构成一颗离屏DOM树
                    appendAllChildren(instance, workInProgress, false, false);

                    workInProgress.stateNode = instance;

                    // 与updateHostComponent类似的处理 props
                    if (
                        finalizeInitialChildren(
                            instance,
                            type,
                            newProps,
                            rootContainerInstance,
                            currentHostContext,
                        )
                    ) {
                        markUpdate(workInProgress);
                    }
                }

                if (workInProgress.ref !== null) {
                    markRef(workInProgress);
                }
            }
            return null;
        }
        //省略...
    }

}
首先和 beginWork 一样,根据 current === null 判断是 mount 还是 update。update 时,主要做了如下几件事情,具体源码 diffProperties:
-
计算新的 STYLE prop
-
计算新的 DANGEROUSLY_SET_INNER_HTML prop
-
计算新的 CHILDREN prop
每次计算出新的 prop,都将其 propKey 与 nextProp 成对的保存在数组 updatePayload 中。最后将 updatePayload 赋值给 wip.updateQueue。
mount 时,处理的事情比较多,大致如下:
-
createInstance: 为 Fiber 节点生成对应的真实 DOM 节点
-
appendAllChildren: 将子孙 DOM 节点插入刚生成的 DOM 节点中。以此从下往上构成完整的 DOM 树
-
finalizeInitialChildren: 在 setInitialProperties 中处理事件注册。在 setInitialDOMProperties 根据 props 初始化 DOM 属性
值的注意的是 appendAllChildren 方法。由于 completeWork 属于向上回溯的过程,每次调用 appendAllChildren 时都会将已生成的子孙 DOM 节点插入当前生成的 DOM 节点下。那么当回溯到根 root 节点时,整个 DOM 树就都已经更新好了。
effectList
在每次 completeWork 后,代表某个节点已经处理完成。前面说过,Reconciler 会为发生改变的节点打上 effectTag,用于在 Renderer 根据节点的 effectTag 的执行具体更新。
因此在 completeWork 的上层函数 completeUnitOfWork 中 (也就是之前省略的代码),每执行完 completeWork 会去维护一个 effectList 的单向链表。如果当前 Fiber 存在 effectTag,则插入链表。
// 构建 effectList 的单向链表
if (
    returnFiber !== null &&
    (returnFiber.effectTag & Incomplete) === NoEffect
) {
    // firstEffect 为链表头结点
    if (returnFiber.firstEffect === null) {
        returnFiber.firstEffect = workInProgress.firstEffect;
    }
    // lastEffect 为链表尾节点
    if (workInProgress.lastEffect !== null) {
        if (returnFiber.lastEffect !== null) {
            returnFiber.lastEffect.nextEffect = workInProgress.firstEffect;
        }
        returnFiber.lastEffect = workInProgress.lastEffect;
    }

    const effectTag = workInProgress.effectTag;

    // 跳过NoWork和PerformedWork tag。后者是提供给React Tools读取
    if (effectTag > PerformedWork) {
        if (returnFiber.lastEffect !== null) {
            returnFiber.lastEffect.nextEffect = workInProgress;
        } else {
            returnFiber.firstEffect = workInProgress;
        }
        returnFiber.lastEffect = workInProgress;
    }
}
至此,Reconciler 流程结束。回头再看看开头的总结,是不是清楚一些了呢~
Renderer(Commit)
Commit 阶段的代码相对另外两个来说是较为简单的。其入口在前面分析过的任务调度入口函数 performConcurrentWorkOnRoot 中的结尾 finishConcurrentRender。最终调用的函数为 commitRootImpl。看看代码:
let nextEffect: Fiber | null = null;

function commitRootImpl(root, renderPriorityLevel) {
    // 省略...
    const finishedWork = root.finishedWork;
    const expirationTime = root.finishedExpirationTime;
    if (finishedWork === null) {
        return null;
    }
    root.finishedWork = null;
    root.finishedExpirationTime = NoWork;

    // commit不可中断。 总是同步完成。
    // 因此,现在可以清除这些内容以允许安排新的回调。
    root.callbackNode = null;
    root.callbackExpirationTime = NoWork;
    root.callbackPriority = NoPriority;
    root.nextKnownPendingLevel = NoWork;
    // 省略...

    // 获取effectList
    let firstEffect;
    if (finishedWork.effectTag > PerformedWork) {
        if (finishedWork.lastEffect !== null) {
            finishedWork.lastEffect.nextEffect = finishedWork;
            firstEffect = finishedWork.firstEffect;
        } else {
            firstEffect = finishedWork;
        }
    } else {
        firstEffect = finishedWork.firstEffect;
    }

    if (firstEffect !== null) {
        // 省略...
        nextEffect = firstEffect;
        do {
            // [Q]: 执行 snapshot = getSnapshotBeforeUpdate()
            // 结果赋值为 Fiber.stateNode.instance.__reactInternalSnapshotBeforeUpdate = snapshot
            commitBeforeMutationEffects();
        } while (nextEffect !== null);
        // 省略...
        nextEffect = firstEffect;
        do {
            // [Q]: 根据Fiber.effectTag 执行具体的增删改DOM操作
            // 如果是卸载组件,还会调用 componentWillUnmount()
            commitMutationEffects(root, renderPriorityLevel);
        } while (nextEffect !== null);
        // 省略...
        nextEffect = firstEffect;
        do {
            // [Q]: 调用 render 后的生命周期
            // current === null ? componentDidMount : componentDidUpdate
            commitLayoutEffects(root, expirationTime);
        } while (nextEffect !== null);
        stopCommitLifeCyclesTimer();

        nextEffect = null;

        // 告诉Scheduler在帧末尾停止调度,这样浏览器就有机会绘制。
        requestPaint();
        // 省略...
    } else {
        // 省略...
    }
    // 省略...
    return null;
}
省略了许多的代码,留下主要的内容。主要逻辑就是拿到 Reconciler 维护的 effectList 链表后,三次遍历该链表,分别做的是:
-
获取 Snapsshot;用于 componentDidUpdate 的第三个参数
-
根据 Fiber.effectTag 对组件或 DOM 执行具体操作
-
调用所有组件的生命周期函数
commitBeforeMutationEffects
完整代码看 commitBeforeMutationLifeCycles,其中 tai 为 ClassComponent 的组件主要逻辑如下:
const current = nextEffect.alternate;
finishedWork = nextEffect;
if (finishedWork.effectTag & Snapshot) {
  if (current !== null) {
      const prevProps = current.memoizedProps;
      const prevState = current.memoizedState;
      const instance = finishedWork.stateNode;
      const snapshot = instance.getSnapshotBeforeUpdate(
          finishedWork.elementType === finishedWork.type
              ? prevProps
              : resolveDefaultProps(finishedWork.type, prevProps),
          prevState,
      );
      instance.__reactInternalSnapshotBeforeUpdate = snapshot;
  }
}
复制代码
commitMutationEffects
function commitMutationEffects(root: FiberRoot, renderPriorityLevel) {
  while (nextEffect !== null) {
      const effectTag = nextEffect.effectTag;

      if (effectTag & ContentReset) {
          // 把节点的文字内容设置为空字符串
          commitResetTextContent(nextEffect);
      }

      if (effectTag & Ref) {
          const current = nextEffect.alternate;
          if (current !== null) {
              // 把ref置空,后续会设置ref,所以之前ref上的值需要先清空
              commitDetachRef(current);
          }
      }
      let primaryEffectTag =
          effectTag & (Placement | Update | Deletion | Hydrating);
      switch (primaryEffectTag) {
          case Placement: {
              commitPlacement(nextEffect);
              // 从effectTag中清除Placement标记
              nextEffect.effectTag &= ~Placement;
              break;
          }
          case PlacementAndUpdate: {
              // Placement
              commitPlacement(nextEffect);
              nextEffect.effectTag &= ~Placement;

              // Update
              const current = nextEffect.alternate;
              commitWork(current, nextEffect);
              break;
          }
          case Update: {
              const current = nextEffect.alternate;
              commitWork(current, nextEffect);
              break;
          }
          case Deletion: {
              // componentWillUnmount
              commitDeletion(root, nextEffect, renderPriorityLevel);
              break;
          }
          // 省略...
      }
      nextEffect = nextEffect.nextEffect;
  }
}
好像也没啥好说的。值得注意的是,开始前会先调用 commitDetachRef 将 ref 的引用清除。然后针对不同的 effectTag 执行不同的 DOM 操作。
-
commitPlacement; 新增节点。其中节点插入位置的计算算法可以看下;
-
commitWork; 根据 Reconciler 在 diffProperties 计算出来的 updateQueue 数组进行 DOM 更新
-
commitDeletion; 这一步会从上往下依次调用该子树下每个组件的 componentWillUnmount 函数
commitLayoutEffects
function commitLayoutEffects(
    root: FiberRoot,
    committedExpirationTime: ExpirationTime,
) {
    while (nextEffect !== null) {
        setCurrentDebugFiberInDEV(nextEffect);

        const effectTag = nextEffect.effectTag;

        if (effectTag & (Update | Callback)) {
            recordEffect();
            const current = nextEffect.alternate;
            commitLayoutEffectOnFiber(
                root,
                current,
                nextEffect,
                committedExpirationTime,
            );
        }

        if (effectTag & Ref) {
            recordEffect();
            commitAttachRef(nextEffect);
        }

        resetCurrentDebugFiberInDEV();
        nextEffect = nextEffect.nextEffect;
    }
}

function commitLifeCycles(
    finishedRoot: FiberRoot,
    current: Fiber | null,
    finishedWork: Fiber,
    committedExpirationTime: ExpirationTime,
): void {
    switch (finishedWork.tag) {
        // ...
        case ClassComponent: {
            const instance = finishedWork.stateNode;
            if (finishedWork.effectTag & Update) {
                if (current === null) {
                    instance.componentDidMount();
                } else {
                    const prevProps =
                        finishedWork.elementType === finishedWork.type
                            ? current.memoizedProps
                            : resolveDefaultProps(finishedWork.type, current.memoizedProps);
                    const prevState = current.memoizedState;
                    instance.componentDidUpdate(
                        prevProps,
                        prevState,
                        instance.__reactInternalSnapshotBeforeUpdate,
                    );
                }
            }
            const updateQueue = finishedWork.updateQueue;
            if (updateQueue !== null) {
                // 调用setState注册的回调函数
                commitUpdateQueue(finishedWork, updateQueue, instance);
            }
            return;
        }
        // ...
    }
}
还是遍历每个 Fiber 节点。如果是 ClassComponent,需要调用生命周期方法。同时对于更新的 ClassComponent,需要判断调用的 setState 是否有回调函数,如果有的话需要在这里一起调用。最后会调用 commitAttachRef 更新 ref 引用。
Commit 阶段的流程到这里也就结束了。
- 原文作者:知识铺
- 原文链接:https://geek.zshipu.com/post/tlg/output/React-%E7%BB%9D%E5%9C%B0%E5%8F%8D%E6%9D%80%E4%B9%8B%E4%B8%87%E5%AD%97%E9%95%BF%E6%96%87%E5%BD%BB%E5%BA%95%E6%90%9E%E6%87%82%E6%B8%B2%E6%9F%93%E6%9B%B4%E6%96%B0%E6%B5%81%E7%A8%8B/
- 版权声明:本作品采用知识共享署名-非商业性使用-禁止演绎 4.0 国际许可协议进行许可,非商业转载请注明出处(作者,原文链接),商业转载请联系作者获得授权。
- 免责声明:本页面内容均来源于站内编辑发布,部分信息来源互联网,并不意味着本站赞同其观点或者证实其内容的真实性,如涉及版权等问题,请立即联系客服进行更改或删除,保证您的合法权益。转载请注明来源,欢迎对文章中的引用来源进行考证,欢迎指出任何有错误或不够清晰的表达。也可以邮件至 sblig@126.com