web3.0 全栈 Web3 开发完整指南
使用 Next.js、Polygon、Solidity、The Graph、IPFS 和 Hardhat 构建全栈 web3 应用程序
本教程的视频也可在此处获得
在这个深入的教程中,您将学习用于构建全栈 web3 应用程序的工具、协议和框架,最重要的是 - 如何将所有内容放在一起为将来构建您自己的任何想法奠定基础。
此应用程序的代码库位于此处
我们将部署到的主要网络是Polygon。我选择 Polygon 是因为它的低交易成本、快速的出块时间和当前的网络采用率。
话虽如此,我们将在以太坊虚拟机(EVM) 上进行构建,因此您可以应用这些技能来构建数十个其他区块链网络,包括以太坊、Celo、Avalanche 等。
我们将构建的应用程序是一个全栈博客以及一个内容管理系统 (CMS),这意味着您将拥有一个可以在任何地方传输和重用的开放、公共和可组合的后端。
在本教程结束时,您应该对现代 web3 堆栈中最重要的部分以及如何构建高性能、可扩展、全栈去中心化区块链应用程序有一个很好的理解。
这是我的“全栈”web3 系列的第四篇指南。还请务必检查:
web3 堆栈
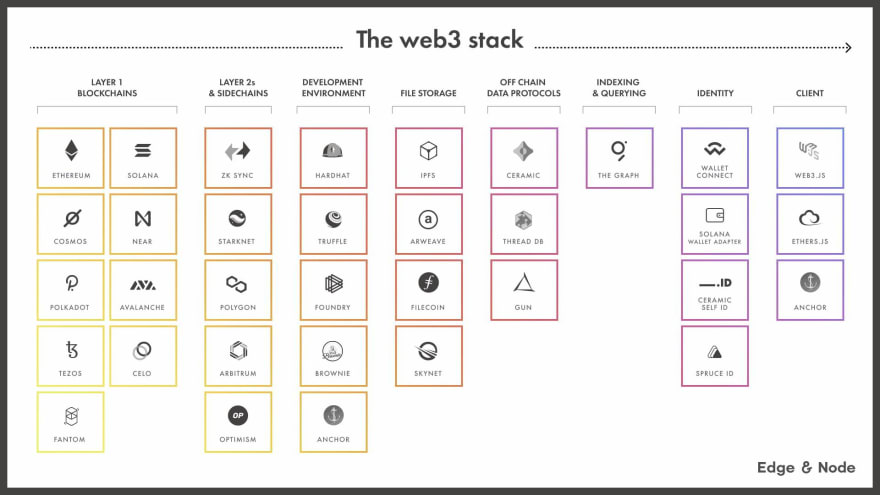
在定义 web3 堆栈中,我结合了我自己的个人经验以及过去一年在Edge & Node团队所做的研究,从开发人员的角度写了我对 web3 技术堆栈当前状态的解释。
我们将为此应用程序使用此堆栈的一部分:
- 区块链 - Polygon(带有可选的 RPC 提供程序)
- 以太坊开发环境——安全帽
- 前端框架 - Next.js & React
- 以太坊网络客户端库 - Ethers.js
- 文件存储 - IPFS
- 索引和查询 -图形协议
学习如何使用这些构建块,我们可以构建多种类型的应用程序,因此本教程的目标是展示它们如何工作以及它们如何组合在一起。
让我们开始吧!
先决条件
- 安装在本地机器上的 Node.js
- 您的浏览器中安装了 MetaMask Chrome 扩展程序
项目设置
在这里,我们将创建应用程序样板,安装所有必要的依赖项,并配置项目。
将对代码进行注释以使您了解正在发生的事情,并且我还将描述整个教程中发生的一些事情。
首先,创建一个新的Next.js应用程序并切换到新目录:
npx create-next-app web3-blog

cd web3-blog
接下来,切换到新目录并使用npm、yarn或pnpm安装以下依赖项:
npm install ethers hardhat @nomiclabs/hardhat-waffle \
ethereum-waffle chai @nomiclabs/hardhat-ethers \
web3modal @walletconnect/web3-provider \
easymde react-markdown react-simplemde-editor \
ipfs-http-client @emotion/css @openzeppelin/contracts
其中一些依赖项的概述:
hardhat - 以太坊开发环境 web3modal - 一个易于使用的库,允许用户将他们的钱包连接到您的应用 react-markdown和simplemde - CMS 的 Markdown 编辑器和 Markdown 渲染器 @emotion/css - JS 库中的一个很棒的 CSS @ openzeppelin/contracts - 有用的智能合约标准和功能的开源实现
接下来,我们将初始化本地智能合约开发环境。
npx hardhat

? What do you want to do? Create a basic sample project
? Hardhat project root: <Choose default path>
如果您在引用README.md时遇到错误,请删除README.md并
npx hardhat再次运行。
这应该搭建出我们将使用的基本 Solidity 开发环境。您应该会看到创建了一些新文件和文件夹,包括contracts、scripts、test和hardhat.config.js。
接下来,让我们在hardhat.config.js更新安全帽配置。
使用以下代码更新此文件:
require("@nomiclabs/hardhat-waffle");

module.exports = {
  solidity: "0.8.4",
  networks: {
    hardhat: {
      chainId: 1337
    },
    // mumbai: {
    //   url: "https://rpc-mumbai.matic.today",
    //   accounts: [process.env.pk]
    // },
    // polygon: {
    //   url: "https://polygon-rpc.com/",
    //   accounts: [process.env.pk]
    // }
  }
};
在这里,我们配置了本地安全帽开发环境,并设置(并注释掉)我们将用于部署到 Polygon 的 Polygon 主网和 Mumbai 测试网环境。
接下来,让我们添加一些基本的全局 CSS,我们将需要这些 CSS 来设置 CMS 的降价编辑器的样式。
打开styles/globals.css并在现有 css 下添加以下代码:
.EasyMDEContainer .editor-toolbar {
  border: none;
}

.EasyMDEContainer .CodeMirror {
  border: none !important;
  background: none;
}

.editor-preview {
  background-color: white !important;
}

.CodeMirror .cm-spell-error:not(.cm-url):not(.cm-comment):not(.cm-tag):not(.cm-word) {
  background-color: transparent !important;
}

pre {
  padding: 20px;
  background-color: #efefef;
}

blockquote {
  border-left: 5px solid #ddd;
  padding-left: 20px;
  margin-left: 0px;
}
接下来,我们将为应用图像创建几个SVG文件,一个用于徽标,一个用于箭头按钮。
在public文件夹中创建**logo.svg和right-arrow.svg**并将链接的 SVG 代码复制到每个文件中。
智能合约
接下来,让我们创建将为我们的博客和 CMS 提供动力的智能合约。
在名为Blog.sol的****contracts文件夹中创建一个新文件。
在这里,添加以下代码:
// contracts/Blog.sol
//SPDX-License-Identifier: Unlicense
pragma solidity ^0.8.0;

import "hardhat/console.sol";
import "@openzeppelin/contracts/utils/Counters.sol";

contract Blog {
    string public name;
    address public owner;

    using Counters for Counters.Counter;
    Counters.Counter private _postIds;

    struct Post {
      uint id;
      string title;
      string content;
      bool published;
    }
    /* mappings can be seen as hash tables */
    /* here we create lookups for posts by id and posts by ipfs hash */
    mapping(uint => Post) private idToPost;
    mapping(string => Post) private hashToPost;

    /* events facilitate communication between smart contractsand their user interfaces  */
    /* i.e. we can create listeners for events in the client and also use them in The Graph  */
    event PostCreated(uint id, string title, string hash);
    event PostUpdated(uint id, string title, string hash, bool published);

    /* when the blog is deployed, give it a name */
    /* also set the creator as the owner of the contract */
    constructor(string memory _name) {
        console.log("Deploying Blog with name:", _name);
        name = _name;
        owner = msg.sender;
    }

    /* updates the blog name */
    function updateName(string memory _name) public {
        name = _name;
    }

    /* transfers ownership of the contract to another address */
    function transferOwnership(address newOwner) public onlyOwner {
        owner = newOwner;
    }

    /* fetches an individual post by the content hash */
    function fetchPost(string memory hash) public view returns(Post memory){
      return hashToPost[hash];
    }

    /* creates a new post */
    function createPost(string memory title, string memory hash) public onlyOwner {
        _postIds.increment();
        uint postId = _postIds.current();
        Post storage post = idToPost[postId];
        post.id = postId;
        post.title = title;
        post.published = true;
        post.content = hash;
        hashToPost[hash] = post;
        emit PostCreated(postId, title, hash);
    }

    /* updates an existing post */
    function updatePost(uint postId, string memory title, string memory hash, bool published) public onlyOwner {
        Post storage post =  idToPost[postId];
        post.title = title;
        post.published = published;
        post.content = hash;
        idToPost[postId] = post;
        hashToPost[hash] = post;
        emit PostUpdated(post.id, title, hash, published);
    }

    /* fetches all posts */
    function fetchPosts() public view returns (Post[] memory) {
        uint itemCount = _postIds.current();

        Post[] memory posts = new Post[](itemCount);
        for (uint i = 0; i < itemCount; i++) {
            uint currentId = i + 1;
            Post storage currentItem = idToPost[currentId];
            posts[i] = currentItem;
        }
        return posts;
    }

    /* this modifier means only the contract owner can */
    /* invoke the function */
    modifier onlyOwner() {
      require(msg.sender == owner);
    _;
  }
}
该合同允许所有者创建和编辑帖子,并允许任何人获取帖子。
要使此智能合约无需许可,您可以删除
onlyOwner修饰符并使用The Graph来索引和查询所有者的帖子。
接下来,让我们编写一个基本测试来测试我们将使用的最重要的功能。
为此,请打开test/sample-test.js并使用以下代码对其进行更新:
const { expect } = require("chai")
const { ethers } = require("hardhat")

describe("Blog", async function () {
  it("Should create a post", async function () {
    const Blog = await ethers.getContractFactory("Blog")
    const blog = await Blog.deploy("My blog")
    await blog.deployed()
    await blog.createPost("My first post", "12345")

    const posts = await blog.fetchPosts()
    expect(posts[0].title).to.equal("My first post")
  })

  it("Should edit a post", async function () {
    const Blog = await ethers.getContractFactory("Blog")
    const blog = await Blog.deploy("My blog")
    await blog.deployed()
    await blog.createPost("My Second post", "12345")

    await blog.updatePost(1, "My updated post", "23456", true)

    posts = await blog.fetchPosts()
    expect(posts[0].title).to.equal("My updated post")
  })

  it("Should add update the name", async function () {
    const Blog = await ethers.getContractFactory("Blog")
    const blog = await Blog.deploy("My blog")
    await blog.deployed()

    expect(await blog.name()).to.equal("My blog")
    await blog.updateName('My new blog')
    expect(await blog.name()).to.equal("My new blog")
  })
})
接下来,通过打开终端并运行以下命令来运行测试:
npx hardhat test
部署合约
现在合约已经编写完成并经过测试,让我们尝试将其部署到本地测试网络。
要启动本地网络,请打开终端至少两个单独的窗口。在一个窗口中,运行以下脚本:
npx hardhat node
当我们运行此命令时,您应该会看到地址和私钥列表。
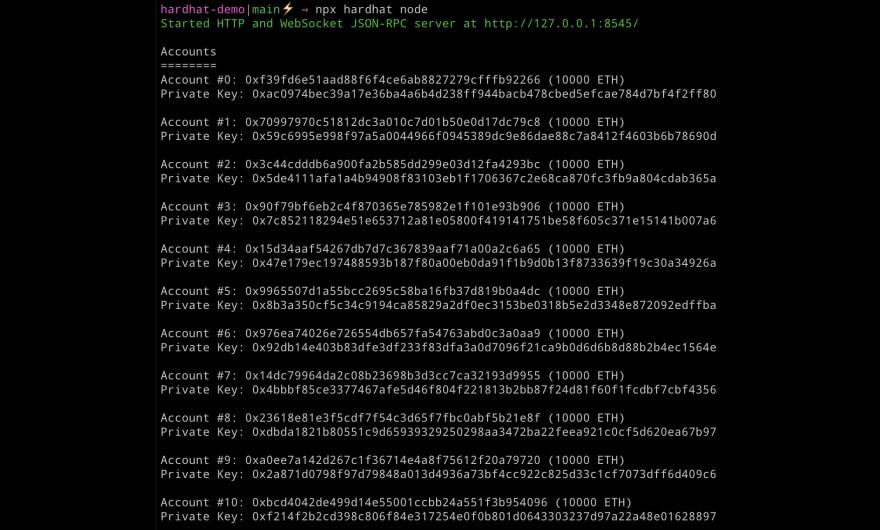
这些是为我们创建的 20 个测试账户和地址,我们可以使用它们来部署和测试我们的智能合约。每个帐户还加载了 10,000 个假以太币。稍后,我们将学习如何将测试帐户导入 MetaMask 以便我们可以使用它。
接下来,我们需要将合约部署到测试网络。首先将scripts/sample-script.js的名称更新为scripts/deploy.js。
接下来,使用这个新的部署脚本更新文件:
/* scripts/deploy.js */
const hre = require("hardhat");
const fs = require('fs');

async function main() {
  /* these two lines deploy the contract to the network */
  const Blog = await hre.ethers.getContractFactory("Blog");
  const blog = await Blog.deploy("My blog");

  await blog.deployed();
  console.log("Blog deployed to:", blog.address);

  /* this code writes the contract addresses to a local */
  /* file named config.js that we can use in the app */
  fs.writeFileSync('./config.js', `
  export const contractAddress = "${blog.address}"
  export const ownerAddress = "${blog.signer.address}"
  `)
}

main()
  .then(() => process.exit(0))
  .catch((error) => {
    console.error(error);
    process.exit(1);
  });
现在在一个单独的窗口中(当本地网络仍在运行时),我们可以运行部署脚本并向 CLI 提供一个我们希望部署到本地网络的标志:
npx hardhat run scripts/deploy.js --network localhost
部署合约后,您应该会在网络终端中看到一些输出🎉。
将测试账户导入您的钱包
要将交易发送到智能合约,我们需要使用运行时创建的帐户之一连接我们的 MetaMask 钱包npx hardhat node。在 CLI 注销的合约列表中,您应该会同时看到Account number和Private Key:
➜  react-dapp git:(main) npx hardhat node
Started HTTP and WebSocket JSON-RPC server at http://127.0.0.1:8545/

Accounts
========
Account #0: 0xf39fd6e51aad88f6f4ce6ab8827279cfffb92266 (10000 ETH)
Private Key: 0xac0974bec39a17e36ba4a6b4d238ff944bacb478cbed5efcae784d7bf4f2ff80

...
我们可以将此帐户导入 MetaMask,以便开始使用那里可用的一些假 Eth。
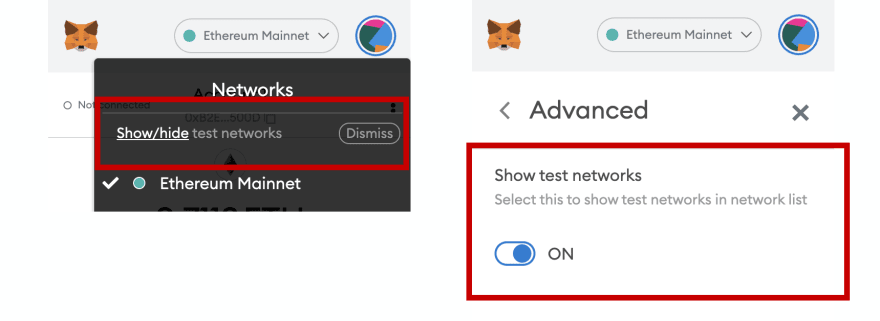
为此,首先打开 MetaMask 并启用测试网络:
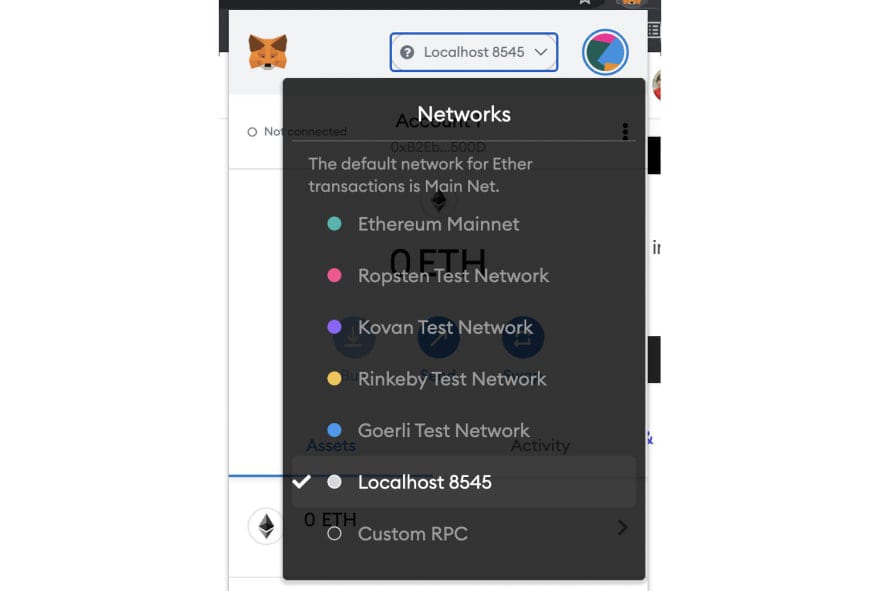
接下来,将网络更新为 Localhost 8545:
接下来,在 MetaMask 中,从帐户菜单中单击Import Account :
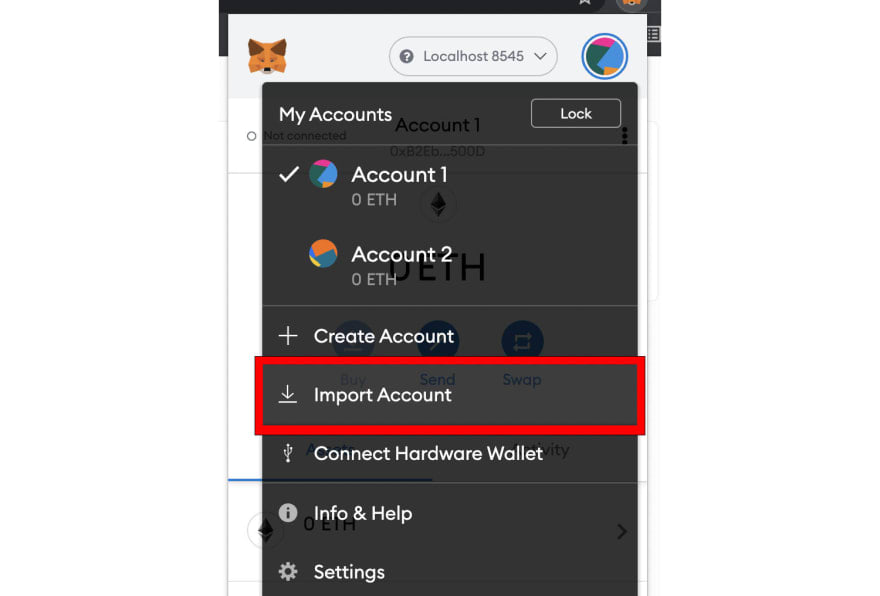
复制然后粘贴CLI 注销的第一个私钥,然后单击****Import。导入帐户后,您应该会看到帐户中的 Eth:
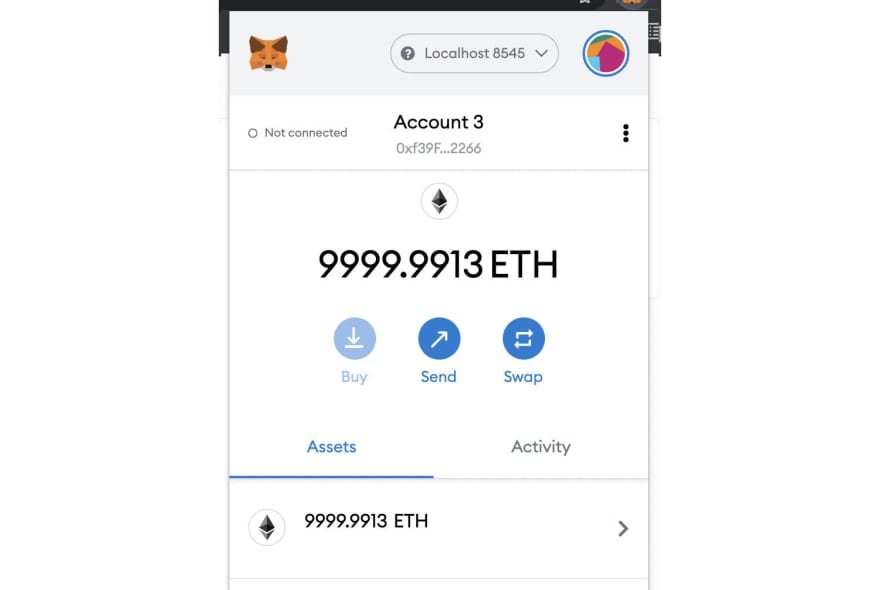
确保您导入了账户列表中的第一个账户(账户#0),因为这将是部署合约时默认使用的账户,因此也是合约所有者。
现在我们已经部署了一个智能合约和一个可以使用的帐户,我们可以从 Next.js 应用程序开始与它进行交互。
Next.js 应用程序
接下来,让我们编写应用程序的代码。
我们要做的第一件事是设置几个环境变量,我们将使用它们在本地测试环境、孟买测试网和 Polygon 主网之间切换。
在项目的根目录中创建一个名为**.env.local**的新文件,并添加以下配置以开始:
ENVIRONMENT="local"
NEXT_PUBLIC_ENVIRONMENT="local"
我们将能够在 、 和 之间local切换testnet这些mainnet变量
这将允许我们在客户端和服务器上引用我们的环境。要了解有关 Next.js 中环境变量如何工作的更多信息,请查看此处的文档。
上下文.js
接下来,让我们创建应用上下文。上下文将为我们提供一种在整个应用程序中共享状态的简单方法。
创建一个名为context.js的文件并添加以下代码:
import { createContext } from 'react'

export const AccountContext = createContext(null)
布局和导航
接下来,让我们打开pages/_app.js。在这里,我们将更新代码以包括导航、钱包连接、上下文和一些基本样式。
此页面用作应用程序其余部分的包装器或布局。
/* pages/__app.js */
import '../styles/globals.css'
import { useState } from 'react'
import Link from 'next/link'
import { css } from '@emotion/css'
import { ethers } from 'ethers'
import Web3Modal from 'web3modal'
import WalletConnectProvider from '@walletconnect/web3-provider'
import { AccountContext } from '../context.js'
import { ownerAddress } from '../config'
import 'easymde/dist/easymde.min.css'

function MyApp({ Component, pageProps }) {
  /* create local state to save account information after signin */
  const [account, setAccount] = useState(null)
  /* web3Modal configuration for enabling wallet access */
  async function getWeb3Modal() {
    const web3Modal = new Web3Modal({
      cacheProvider: false,
      providerOptions: {
        walletconnect: {
          package: WalletConnectProvider,
          options: {
            infuraId: "your-infura-id"
          },
        },
      },
    })
    return web3Modal
  }

  /* the connect function uses web3 modal to connect to the user's wallet */
  async function connect() {
    try {
      const web3Modal = await getWeb3Modal()
      const connection = await web3Modal.connect()
      const provider = new ethers.providers.Web3Provider(connection)
      const accounts = await provider.listAccounts()
      setAccount(accounts[0])
    } catch (err) {
      console.log('error:', err)
    }
  }

  return (
    <div>
      <nav className={nav}>
        <div className={header}>
          <Link href="/">
            <a>
              <img
                src='/logo.svg'
                alt="React Logo"
                style={{ width: '50px' }}
              />
            </a>
          </Link>
          <Link href="/">
            <a>
              <div className={titleContainer}>
                <h2 className={title}>Full Stack</h2>
                <p className={description}>WEB3</p>
              </div>
            </a>
          </Link>
          {
            !account && (
              <div className={buttonContainer}>
                <button className={buttonStyle} onClick={connect}>Connect</button>
              </div>
            )
          }
          {
            account && <p className={accountInfo}>{account}</p>
          }
        </div>
        <div className={linkContainer}>
          <Link href="/" >
            <a className={link}>
              Home
            </a>
          </Link>
          {
            /* if the signed in user is the contract owner, we */
            /* show the nav link to create a new post */
            (account === ownerAddress) && (
              <Link href="/create-post">
                <a className={link}>
                  Create Post
                </a>
              </Link>
            )
          }
        </div>
      </nav>
      <div className={container}>
        <AccountContext.Provider value={account}>
          <Component {...pageProps} connect={connect} />
        </AccountContext.Provider>
      </div>
    </div>
  )
}

const accountInfo = css`
  width: 100%;
  display: flex;
  flex: 1;
  justify-content: flex-end;
  font-size: 12px;
`

const container = css`
  padding: 40px;
`

const linkContainer = css`
  padding: 30px 60px;
  background-color: #fafafa;
`

const nav = css`
  background-color: white;
`

const header = css`
  display: flex;
  border-bottom: 1px solid rgba(0, 0, 0, .075);
  padding: 20px 30px;
`

const description = css`
  margin: 0;
  color: #999999;
`

const titleContainer = css`
  display: flex;
  flex-direction: column;
  padding-left: 15px;
`

const title = css`
  margin-left: 30px;
  font-weight: 500;
  margin: 0;
`

const buttonContainer = css`
  width: 100%;
  display: flex;
  flex: 1;
  justify-content: flex-end;
`

const buttonStyle = css`
  background-color: #fafafa;
  outline: none;
  border: none;
  font-size: 18px;
  padding: 16px 70px;
  border-radius: 15px;
  cursor: pointer;
  box-shadow: 7px 7px rgba(0, 0, 0, .1);
`

const link = css`
  margin: 0px 40px 0px 0px;
  font-size: 16px;
  font-weight: 400;
`

export default MyApp
入口点
现在我们已经设置了布局,让我们创建应用程序的入口点。
此页面将从网络中获取帖子列表并在列表视图中呈现帖子标题。当用户点击帖子时,我们会将他们导航到另一个页面以查看详细信息(接下来将创建页面)。
/* pages/index.js */
import { css } from '@emotion/css'
import { useContext } from 'react'
import { useRouter } from 'next/router'
import { ethers } from 'ethers'
import Link from 'next/link'
import { AccountContext } from '../context'

/* import contract address and contract owner address */
import {
  contractAddress, ownerAddress
} from '../config'

/* import Application Binary Interface (ABI) */
import Blog from '../artifacts/contracts/Blog.sol/Blog.json'

export default function Home(props) {
  /* posts are fetched server side and passed in as props */
  /* see getServerSideProps */
  const { posts } = props
  const account = useContext(AccountContext)

  const router = useRouter()
  async function navigate() {
    router.push('/create-post')
  }

  return (
    <div>
      <div className={postList}>
        {
          /* map over the posts array and render a button with the post title */
          posts.map((post, index) => (
            <Link href={`/post/${post[2]}`} key={index}>
              <a>
                <div className={linkStyle}>
                  <p className={postTitle}>{post[1]}</p>
                  <div className={arrowContainer}>
                  <img
                      src='/right-arrow.svg'
                      alt='Right arrow'
                      className={smallArrow}
                    />
                  </div>
                </div>
              </a>
            </Link>
          ))
        }
      </div>
      <div className={container}>
        {
          (account === ownerAddress) && posts && !posts.length && (
            /* if the signed in user is the account owner, render a button */
            /* to create the first post */
            <button className={buttonStyle} onClick={navigate}>
              Create your first post
              <img
                src='/right-arrow.svg'
                alt='Right arrow'
                className={arrow}
              />
            </button>
          )
        }
      </div>
    </div>
  )
}

export async function getServerSideProps() {
  /* here we check to see the current environment variable */
  /* and render a provider based on the environment we're in */
  let provider
  if (process.env.ENVIRONMENT === 'local') {
    provider = new ethers.providers.JsonRpcProvider()
  } else if (process.env.ENVIRONMENT === 'testnet') {
    provider = new ethers.providers.JsonRpcProvider('https://rpc-mumbai.matic.today')
  } else {
    provider = new ethers.providers.JsonRpcProvider('https://polygon-rpc.com/')
  }

  const contract = new ethers.Contract(contractAddress, Blog.abi, provider)
  const data = await contract.fetchPosts()
  return {
    props: {
      posts: JSON.parse(JSON.stringify(data))
    }
  }
}

const arrowContainer = css`
  display: flex;
  flex: 1;
  justify-content: flex-end;
  padding-right: 20px;
`

const postTitle = css`
  font-size: 30px;
  font-weight: bold;
  cursor: pointer;
  margin: 0;
  padding: 20px;
`

const linkStyle = css`
  border: 1px solid #ddd;
  margin-top: 20px;
  border-radius: 8px;
  display: flex;
`

const postList = css`
  width: 700px;
  margin: 0 auto;
  padding-top: 50px;
`

const container = css`
  display: flex;
  justify-content: center;
`

const buttonStyle = css`
  margin-top: 100px;
  background-color: #fafafa;
  outline: none;
  border: none;
  font-size: 44px;
  padding: 20px 70px;
  border-radius: 15px;
  cursor: pointer;
  box-shadow: 7px 7px rgba(0, 0, 0, .1);
`

const arrow = css`
  width: 35px;
  margin-left: 30px;
`

const smallArrow = css`
  width: 25px;
`
创建帖子
接下来,在pages目录中创建一个名为create-post.js的新文件。
这将保存允许我们创建帖子并将它们保存到网络的路线。
我们还可以选择将封面图像上传并保存到 IPFS,将 ipfs 上传的哈希值与其余大部分数据锚定在链上。
将以下代码添加到该文件中:
/* pages/create-post.js */
import { useState, useRef, useEffect } from 'react' // new
import { useRouter } from 'next/router'
import dynamic from 'next/dynamic'
import { css } from '@emotion/css'
import { ethers } from 'ethers'
import { create } from 'ipfs-http-client'

/* import contract address and contract owner address */
import {
  contractAddress
} from '../config'

import Blog from '../artifacts/contracts/Blog.sol/Blog.json'

/* define the ipfs endpoint */
const client = create('https://ipfs.infura.io:5001/api/v0')

/* configure the markdown editor to be client-side import */
const SimpleMDE = dynamic(
  () => import('react-simplemde-editor'),
  { ssr: false }
)

const initialState = { title: '', content: '' }

function CreatePost() {
  /* configure initial state to be used in the component */
  const [post, setPost] = useState(initialState)
  const [image, setImage] = useState(null)
  const [loaded, setLoaded] = useState(false)

  const fileRef = useRef(null)
  const { title, content } = post
  const router = useRouter()

  useEffect(() => {
    setTimeout(() => {
      /* delay rendering buttons until dynamic import is complete */
      setLoaded(true)
    }, 500)
  }, [])

  function onChange(e) {
    setPost(() => ({ ...post, [e.target.name]: e.target.value }))
  }

  async function createNewPost() {
    /* saves post to ipfs then anchors to smart contract */
    if (!title || !content) return
    const hash = await savePostToIpfs()
    await savePost(hash)
    router.push(`/`)
  }

  async function savePostToIpfs() {
    /* save post metadata to ipfs */
    try {
      const added = await client.add(JSON.stringify(post))
      return added.path
    } catch (err) {
      console.log('error: ', err)
    }
  }

  async function savePost(hash) {
    /* anchor post to smart contract */
    if (typeof window.ethereum !== 'undefined') {
      const provider = new ethers.providers.Web3Provider(window.ethereum)
      const signer = provider.getSigner()
      const contract = new ethers.Contract(contractAddress, Blog.abi, signer)
      console.log('contract: ', contract)
      try {
        const val = await contract.createPost(post.title, hash)
        /* optional - wait for transaction to be confirmed before rerouting */
        /* await provider.waitForTransaction(val.hash) */
        console.log('val: ', val)
      } catch (err) {
        console.log('Error: ', err)
      }
    }
  }

  function triggerOnChange() {
    /* trigger handleFileChange handler of hidden file input */
    fileRef.current.click()
  }

  async function handleFileChange (e) {
    /* upload cover image to ipfs and save hash to state */
    const uploadedFile = e.target.files[0]
    if (!uploadedFile) return
    const added = await client.add(uploadedFile)
    setPost(state => ({ ...state, coverImage: added.path }))
    setImage(uploadedFile)
  }

  return (
    <div className={container}>
      {
        image && (
          <img className={coverImageStyle} src={URL.createObjectURL(image)} />
        )
      }
      <input
        onChange={onChange}
        name='title'
        placeholder='Give it a title ...'
        value={post.title}
        className={titleStyle}
      />
      <SimpleMDE
        className={mdEditor}
        placeholder="What's on your mind?"
        value={post.content}
        onChange={value => setPost({ ...post, content: value })}
      />
      {
        loaded && (
          <>
            <button
              className={button}
              type='button'
              onClick={createNewPost}
            >Publish</button>
            <button
              onClick={triggerOnChange}
              className={button}
            >Add cover image</button>
          </>
        )
      }
      <input
        id='selectImage'
        className={hiddenInput}
        type='file'
        onChange={handleFileChange}
        ref={fileRef}
      />
    </div>
  )
}

const hiddenInput = css`
  display: none;
`

const coverImageStyle = css`
  max-width: 800px;
`

const mdEditor = css`
  margin-top: 40px;
`

const titleStyle = css`
  margin-top: 40px;
  border: none;
  outline: none;
  background-color: inherit;
  font-size: 44px;
  font-weight: 600;
  &::placeholder {
    color: #999999;
  }
`

const container = css`
  width: 800px;
  margin: 0 auto;
`

const button = css`
  background-color: #fafafa;
  outline: none;
  border: none;
  border-radius: 15px;
  cursor: pointer;
  margin-right: 10px;
  font-size: 18px;
  padding: 16px 70px;
  box-shadow: 7px 7px rgba(0, 0, 0, .1);
`

export default CreatePost
查看帖子
既然我们有能力创建帖子,我们如何导航和查看帖子?我们希望能够查看类似myapp.com/post/some-post-id.
我们可以使用next.js 动态路由以几种不同的方式做到这一点。
我们将使用getStaticPaths和getStaticProps来利用服务器端数据获取,这将在构建时使用从网络查询的帖子数组创建这些页面。
为此,请在pages目录中创建一个名为post的新文件夹,并在该文件夹中创建一个名为**[id].js**的文件。在那里,添加以下代码:
/* pages/post/[id].js */
import ReactMarkdown from 'react-markdown'
import { useContext } from 'react'
import { useRouter } from 'next/router'
import Link from 'next/link'
import { css } from '@emotion/css'
import { ethers } from 'ethers'
import { AccountContext } from '../../context'

/* import contract and owner addresses */
import {
  contractAddress, ownerAddress
} from '../../config'
import Blog from '../../artifacts/contracts/Blog.sol/Blog.json'

const ipfsURI = 'https://ipfs.io/ipfs/'

export default function Post({ post }) {
  const account = useContext(AccountContext)
  const router = useRouter()
  const { id } = router.query

  if (router.isFallback) {
    return <div>Loading...</div>
  }

  return (
    <div>
      {
        post && (
          <div className={container}>
            {
              /* if the owner is the user, render an edit button */
              ownerAddress === account && (
                <div className={editPost}>
                  <Link href={`/edit-post/${id}`}>
                    <a>
                      Edit post
                    </a>
                  </Link>
                </div>
              )
            }
            {
              /* if the post has a cover image, render it */
              post.coverImage && (
                <img
                  src={post.coverImage}
                  className={coverImageStyle}
                />
              )
            }
            <h1>{post.title}</h1>
            <div className={contentContainer}>
              <ReactMarkdown>{post.content}</ReactMarkdown>
            </div>
          </div>
        )
      }
    </div>
  )
}

export async function getStaticPaths() {
  /* here we fetch the posts from the network */
  let provider
  if (process.env.ENVIRONMENT === 'local') {
    provider = new ethers.providers.JsonRpcProvider()
  } else if (process.env.ENVIRONMENT === 'testnet') {
    provider = new ethers.providers.JsonRpcProvider('https://rpc-mumbai.matic.today')
  } else {
    provider = new ethers.providers.JsonRpcProvider('https://polygon-rpc.com/')
  }

  const contract = new ethers.Contract(contractAddress, Blog.abi, provider)
  const data = await contract.fetchPosts()

  /* then we map over the posts and create a params object passing */
  /* the id property to getStaticProps which will run for ever post */
  /* in the array and generate a new page */
  const paths = data.map(d => ({ params: { id: d[2] } }))

  return {
    paths,
    fallback: true
  }
}

export async function getStaticProps({ params }) {
  /* using the id property passed in through the params object */
  /* we can us it to fetch the data from IPFS and pass the */
  /* post data into the page as props */
  const { id } = params
  const ipfsUrl = `${ipfsURI}/${id}`
  const response = await fetch(ipfsUrl)
  const data = await response.json()
  if(data.coverImage) {
    let coverImage = `${ipfsURI}/${data.coverImage}`
    data.coverImage = coverImage
  }

  return {
    props: {
      post: data
    },
  }
}

const editPost = css`
  margin: 20px 0px;
`

const coverImageStyle = css`
  width: 900px;
`

const container = css`
  width: 900px;
  margin: 0 auto;
`

const contentContainer = css`
  margin-top: 60px;
  padding: 0px 40px;
  border-left: 1px solid #e7e7e7;
  border-right: 1px solid #e7e7e7;
  & img {
    max-width: 900px;
  }
`
编辑帖子
我们需要创建的最后一个页面是一种编辑现有帖子的方法。
此页面将继承pages/create-post.js和pages/post/[id].js的一些功能。我们将能够在查看和编辑帖子之间切换。
在pages目录中创建一个名为edit-post的新文件夹和一个名为**[id].js**的文件。接下来,添加以下代码:
/* pages/edit-post/[id].js */
import { useState, useEffect } from 'react'
import { useRouter } from 'next/router'
import ReactMarkdown from 'react-markdown'
import { css } from '@emotion/css'
import dynamic from 'next/dynamic'
import { ethers } from 'ethers'
import { create } from 'ipfs-http-client'

import {
  contractAddress
} from '../../config'
import Blog from '../../artifacts/contracts/Blog.sol/Blog.json'

const ipfsURI = 'https://ipfs.io/ipfs/'
const client = create('https://ipfs.infura.io:5001/api/v0')

const SimpleMDE = dynamic(
  () => import('react-simplemde-editor'),
  { ssr: false }
)

export default function Post() {
  const [post, setPost] = useState(null)
  const [editing, setEditing] = useState(true)
  const router = useRouter()
  const { id } = router.query

  useEffect(() => {
    fetchPost()
  }, [id])
  async function fetchPost() {
    /* we first fetch the individual post by ipfs hash from the network */
    if (!id) return
    let provider
    if (process.env.NEXT_PUBLIC_ENVIRONMENT === 'local') {
      provider = new ethers.providers.JsonRpcProvider()
    } else if (process.env.NEXT_PUBLIC_ENVIRONMENT === 'testnet') {
      provider = new ethers.providers.JsonRpcProvider('https://rpc-mumbai.matic.today')
    } else {
      provider = new ethers.providers.JsonRpcProvider('https://polygon-rpc.com/')
    }
    const contract = new ethers.Contract(contractAddress, Blog.abi, provider)
    const val = await contract.fetchPost(id)
    const postId = val[0].toNumber()

    /* next we fetch the IPFS metadata from the network */
    const ipfsUrl = `${ipfsURI}/${id}`
    const response = await fetch(ipfsUrl)
    const data = await response.json()
    if(data.coverImage) {
      let coverImagePath = `${ipfsURI}/${data.coverImage}`
      data.coverImagePath = coverImagePath
    }
    /* finally we append the post ID to the post data */
    /* we need this ID to make updates to the post */
    data.id = postId;
    setPost(data)
  }

  async function savePostToIpfs() {
    try {
      const added = await client.add(JSON.stringify(post))
      return added.path
    } catch (err) {
      console.log('error: ', err)
    }
  }

  async function updatePost() {
    const hash = await savePostToIpfs()
    const provider = new ethers.providers.Web3Provider(window.ethereum)
    const signer = provider.getSigner()
    const contract = new ethers.Contract(contractAddress, Blog.abi, signer)
    await contract.updatePost(post.id, post.title, hash, true)
    router.push('/')
  }

  if (!post) return null

  return (
    <div className={container}>
      {
      /* editing state will allow the user to toggle between */
      /*  a markdown editor and a markdown renderer */
      }
      {
        editing && (
          <div>
            <input
              onChange={e => setPost({ ...post, title: e.target.value })}
              name='title'
              placeholder='Give it a title ...'
              value={post.title}
              className={titleStyle}
            />
            <SimpleMDE
              className={mdEditor}
              placeholder="What's on your mind?"
              value={post.content}
              onChange={value => setPost({ ...post, content: value })}
            />
            <button className={button} onClick={updatePost}>Update post</button>
          </div>
        )
      }
      {
        !editing && (
          <div>
            {
              post.coverImagePath && (
                <img
                  src={post.coverImagePath}
                  className={coverImageStyle}
                />
              )
            }
            <h1>{post.title}</h1>
            <div className={contentContainer}>
              <ReactMarkdown>{post.content}</ReactMarkdown>
            </div>
          </div>
        )
      }
      <button className={button} onClick={() => setEditing(editing ? false : true)}>{ editing ? 'View post' : 'Edit post'}</button>
    </div>
  )
}

const button = css`
  background-color: #fafafa;
  outline: none;
  border: none;
  border-radius: 15px;
  cursor: pointer;
  margin-right: 10px;
  margin-top: 15px;
  font-size: 18px;
  padding: 16px 70px;
  box-shadow: 7px 7px rgba(0, 0, 0, .1);
`

const titleStyle = css`
  margin-top: 40px;
  border: none;
  outline: none;
  background-color: inherit;
  font-size: 44px;
  font-weight: 600;
  &::placeholder {
    color: #999999;
  }
`

const mdEditor = css`
  margin-top: 40px;
`

const coverImageStyle = css`
  width: 900px;
`

const container = css`
  width: 900px;
  margin: 0 auto;
`

const contentContainer = css`
  margin-top: 60px;
  padding: 0px 40px;
  border-left: 1px solid #e7e7e7;
  border-right: 1px solid #e7e7e7;
  & img {
    max-width: 900px;
  }
`
测试一下
我们现在可以测试它了。
为此,请确保您已在前面的步骤中将合约部署到网络,并且本地网络仍在运行。
打开一个新的终端窗口并启动 Next.js 应用程序:
npm run dev
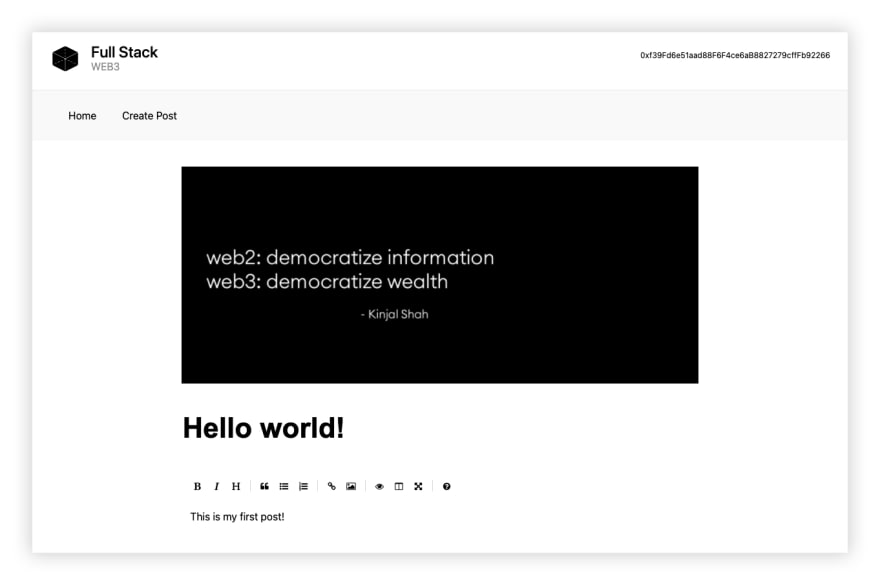
当应用程序启动时,您应该能够连接您的钱包并与应用程序进行交互。

您还应该能够创建一个新帖子。
您可能会注意到该应用程序的速度并没有达到应有的速度,但 Next.js 在生产环境中的速度非常快。
要运行生产构建,请运行以下命令:
npm run build && npm start
部署到多边形
现在我们已经在本地启动并运行并测试了项目,让我们部署到 Polygon。我们将从部署到Polygon 测试网络Mumbai开始。
我们需要做的第一件事是将钱包中的一个私钥设置为环境变量。
要获取私钥,您可以直接从 MetaMask 导出它们。
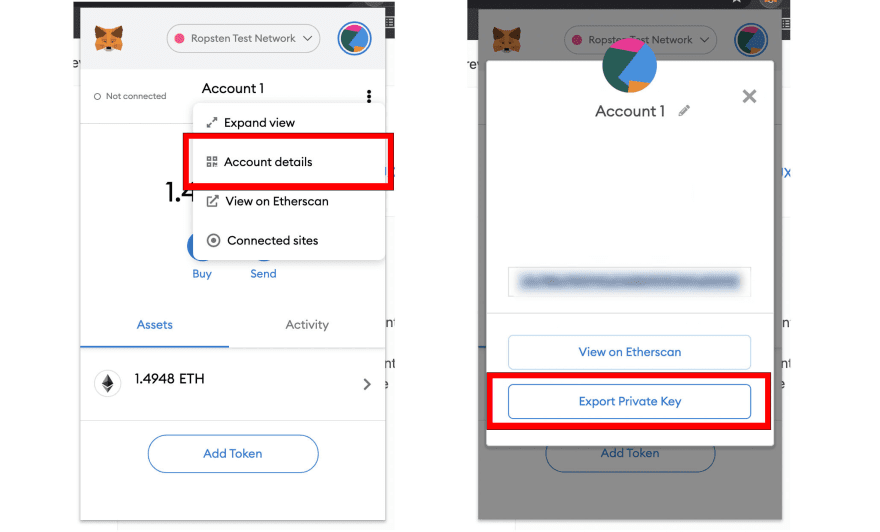
在任何情况下,私钥都不应该公开共享。建议永远不要在文件中硬编码私钥。如果您确实选择这样做,请务必使用测试钱包,并且在任何情况下都不要将包含私钥的文件推送到源代码控制或公开公开。
如果您在 Mac 上,您可以像这样从命令行设置环境变量(确保从同一终端和会话运行部署脚本):
export pk="your-private-key"
配置网络
接下来,我们需要从本地测试网络切换到孟买测试网络。
为此,我们需要创建和设置网络配置。
首先,打开 MetaMask 并点击Settings。
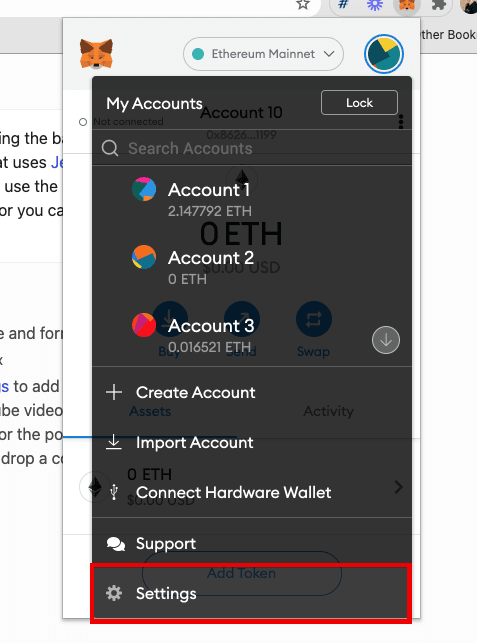
接下来,单击网络,然后单击添加网络:
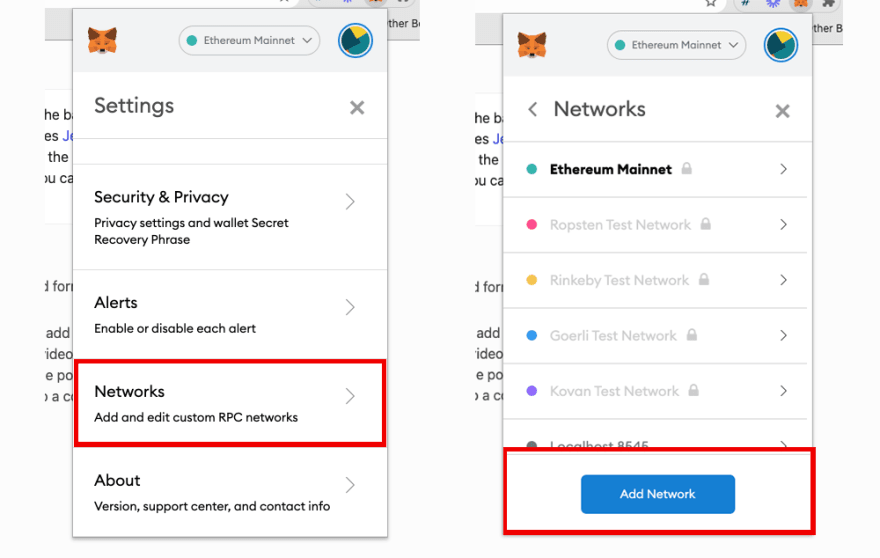
在这里,我们将为孟买测试网络添加以下配置,如下所示:
网络名称:Mumbai TestNet 新的 RPC URL:https ://rpc-mumbai.matic.today 链 ID:80001 货币符号:Matic
保存这个,然后你应该可以切换到并使用新的网络了!
最后,您将需要一些测试网 Polygon 令牌才能与应用程序交互。
要获得这些,您可以访问Polygon Faucet,输入您想要请求代币的钱包地址。
部署到 Polygon 网络
现在您有了一些令牌,您可以部署到 Polygon 网络!
为此,请确保与您部署合约的私钥关联的地址已收到一些代币,以支付交易的汽油费。
接下来,取消注释mumbaihardhat.config.js 中的配置:
mumbai: {
  url: "https://rpc-mumbai.matic.today",
  accounts: [process.env.pk]
},
要部署到 Polygon 测试网,请运行以下命令:
npx hardhat run scripts/deploy.js --network mumbai
如果您遇到此错误:
ProviderError: RPCError,公共 RPC 可能会拥塞。在生产环境中,建议使用Infura、Alchemy或Quicknode等 RPC 提供程序。
接下来,将.env.local中的环境变量更新为testnet:
ENVIRONMENT="testnet"
NEXT_PUBLIC_ENVIRONMENT="testnet"
接下来,重新启动服务器以注册环境变量中的更改:
npm run dev
您现在应该可以在新网络上测试应用了🎉!
如果您在连接到公共 Mumbai RPC 端点时遇到任何问题,请考虑使用来自 RPC 提供程序(如Infura、Alchemy或Quicknode )的端点替换应用程序中的端点。
创建子图 API
默认情况下,我们拥有的唯一数据访问模式是我们写入合约的两个函数,fetchPost以及fetchPosts.
这是一个很好的起点,但随着您的应用程序开始扩展,您可能会发现自己需要更灵活和可扩展的 API。
例如,如果我们想让用户能够搜索帖子、获取某个用户创建的帖子或按帖子创建日期对帖子进行排序,该怎么办?
我们可以使用The Graph协议将所有这些功能构建到 API 中。让我们看看如何做到这一点。
在 The Graph 中创建项目
要开始使用,请访问The Graph 托管服务并登录或创建一个新帐户。
接下来,转到仪表板并单击添加子图以创建新的子图。
使用以下属性配置您的子图:
- 子图名称 - Blogcms
- 副标题 -用于查询帖子数据的子图
- 可选 - 填写描述和 GITHUB URL 属性
创建子图后,我们将使用 Graph CLI 在本地初始化子图。
使用 Graph CLI 初始化新子图
接下来,安装 Graph CLI:
$ npm install -g @graphprotocol/graph-cli

# or

$ yarn global add @graphprotocol/graph-cli
安装 Graph CLI 后,您可以使用 Graph CLIinit命令初始化新的子图。
由于我们已经将合约部署到网络,我们可以通过使用--from-contract标志传入合约地址来从该合约地址进行初始化。
该地址在config.js中作为contractAddress.
$ graph init --from-contract your-contract-address \
--network mumbai --contract-name Blog --index-events

? Protocol: ethereum
? Product for which to initialize › hosted-service
? Subgraph name › your-username/blogcms
? Directory to create the subgraph in › blogcms
? Ethereum network › mumbai
? Contract address › your-contract-address
? ABI file (path) › artifacts/contracts/Blog.sol/Blog.json
? Contract Name › Blog
此命令将根据作为参数传入的合约地址生成一个基本子图--from-contract。通过使用这个合约地址,CLI 将在您的项目中初始化一些东西以帮助您开始(包括获取abis并将它们保存在abis目录中)。
通过传入
--index-eventsCLI,将根据合约发出的事件自动在schema.graphql和src/mapping.ts中为我们填充一些代码。
子图的主要配置和定义位于subgraph.yaml文件中。子图代码库由几个文件组成:
- subgraph.yaml:包含子图清单的 YAML 文件
- schema.graphql:一个 GraphQL 模式,它定义了为您的子图存储哪些数据,以及如何通过 GraphQL 查询它
- AssemblyScript Mappings:AssemblyScript 代码,可将以太坊中的事件数据转换为您的架构中定义的实体(例如本教程中的 mapping.ts)
我们将使用的subgraph.yaml中的条目是:
description(可选):子图是什么的人类可读描述。当子图部署到托管服务时,图资源管理器会显示此描述。repository(可选):可以找到子图清单的存储库的 URL。这也由 Graph Explorer 显示。dataSources.source:子图源的智能合约地址,以及要使用的智能合约的abi。地址是可选的;省略它允许索引来自所有合约的匹配事件。dataSources.source.startBlock(可选):数据源开始索引的块的编号。在大多数情况下,我们建议使用创建合约的区块。dataSources.mapping.entities:数据源写入存储的实体。每个实体的架构在 schema.graphql 文件中定义。dataSources.mapping.abis:源合约以及您在映射中与之交互的任何其他智能合约的一个或多个命名 ABI 文件。dataSources.mapping.eventHandlers:列出此子图响应的智能合约事件以及映射中的处理程序(示例中为**./src/mapping.ts** ),这些处理程序将这些事件转换为存储中的实体。
定义实体
使用 The Graph,您可以在schema.graphql中定义实体类型,Graph Node 将生成顶级字段以查询该实体类型的单个实例和集合。每个应该是实体的类型都需要使用@entity指令进行注释。
我们将索引的实体/数据是Token和User。通过这种方式,我们可以索引用户以及用户自己创建的 Token。
为此,请使用以下代码更新schema.graphql :
type _Schema_
  @fulltext(
    name: "postSearch"
    language: en
    algorithm: rank
    include: [{ entity: "Post", fields: [{ name: "title" }, { name: "postContent" }] }]
  )

type Post @entity {
  id: ID!
  title: String!
  contentHash: String!
  published: Boolean!
  postContent: String!
  createdAtTimestamp: BigInt!
  updatedAtTimestamp: BigInt!
}
现在我们已经为我们的应用程序创建了 GraphQL 模式,我们可以在本地生成实体以开始在mappingsCLI 创建的实体中使用:
graph codegen
为了使智能合约、事件和实体的工作变得简单且类型安全,Graph CLI 从子图的 GraphQL 模式和数据源中包含的合约 ABI 的组合中生成 AssemblyScript 类型。
使用实体和映射更新子图
现在我们可以配置subgraph.yaml以使用我们刚刚创建的实体并配置它们的映射。
为此,首先使用和实体更新dataSources.mapping.entities字段:User``Token
entities:
  - Post
接下来,我们需要找到部署合约的区块(可选)。我们需要这个,以便我们可以设置索引器开始同步的起始块,这样它就不需要从创世块同步。您可以通过访问https://mumbai.polygonscan.com/并粘贴您的合约地址来找到起始块。
最后,更新配置以添加startBlock:
source:
  address: "your-contract-adddress"
  abi: Blog
  startBlock: your-start-block
汇编脚本映射
接下来,打开src/mappings.ts以编写我们在子图 subgraph 中定义的映射eventHandlers。
使用以下代码更新文件:
import {
  PostCreated as PostCreatedEvent,
  PostUpdated as PostUpdatedEvent
} from "../generated/Blog/Blog"
import {
  Post
} from "../generated/schema"
import { ipfs, json } from '@graphprotocol/graph-ts'

export function handlePostCreated(event: PostCreatedEvent): void {
  let post = new Post(event.params.id.toString());
  post.title = event.params.title;
  post.contentHash = event.params.hash;
  let data = ipfs.cat(event.params.hash);
  if (data) {
    let value = json.fromBytes(data).toObject()
    if (value) {
      const content = value.get('content')
      if (content) {
        post.postContent = content.toString()
      }
    }
  }
  post.createdAtTimestamp = event.block.timestamp;
  post.save()
}

export function handlePostUpdated(event: PostUpdatedEvent): void {
  let post = Post.load(event.params.id.toString());
  if (post) {
    post.title = event.params.title;
    post.contentHash = event.params.hash;
    post.published = event.params.published;
    let data = ipfs.cat(event.params.hash);
    if (data) {
      let value = json.fromBytes(data).toObject()
      if (value) {
        const content = value.get('content')
        if (content) {
          post.postContent = content.toString()
        }
      }
    }
    post.updatedAtTimestamp = event.block.timestamp;
    post.save()
  }
}
这些映射将处理创建新帖子和更新帖子的事件。当这些事件触发时,映射会将数据保存到子图中。
运行构建
接下来,让我们运行构建以确保一切都配置正确。为此,请运行以下build命令:
$ graph build
如果构建成功,您应该会在根目录中看到一个新的构建文件夹。
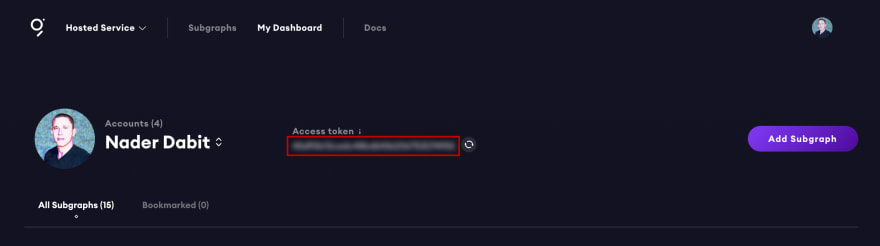
部署子图
要部署,我们可以运行deploy命令。要进行部署,您首先需要为您的帐户复制访问令牌,该令牌在Graph Dashboard中可用:
接下来,运行以下命令:
$ graph auth
✔ Product for which to initialize · hosted-service
✔ Deploy key · ********************************
部署子图:
$ yarn deploy
部署子图后,您应该会看到它显示在仪表板中。
当您单击子图时,它应该打开子图详细信息:
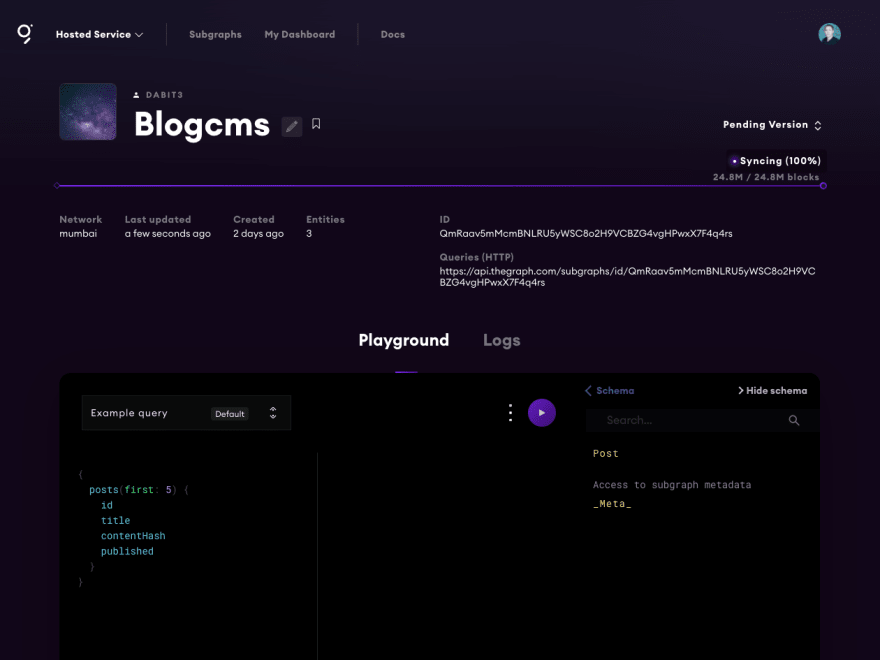
查询数据
现在我们在仪表板中,我们应该能够开始查询数据。运行以下查询以获取帖子列表:
{
  posts {
    id
    title
    contentHash
    published
    postContent
  }
}
我们还可以按创建日期配置订单方向:
{
  posts(
    orderBy: createdAtTimestamp
    orderDirection: desc
  ) {
    id
    title
    contentHash
    published
    postContent
  }
}
我们还可以对帖子标题或内容进行全文搜索:
{
  postSearch(
    text: "Hello"
  ) {
    id
    title
    contentHash
    published
    postContent
  }
}
恭喜,您现在已经构建了一个更灵活的 API,您可以使用它来查询您的应用程序!
要了解如何在您的应用程序中使用 API 端点,请查看此处的文档或此处的视频
下一步
如果您想要挑战,请考虑添加一些功能,允许您更新pages/edit-post/[id].js中的封面图像。
如果您想将代码部署到 web3/分散式 git 托管协议,请查看 Radicle上的此视频。
如果您想部署您的应用程序并使其上线,请查看Vercel。
如果您喜欢本教程,请务必查看我的其他三个综合指南:
- 原文作者:知识铺
- 原文链接:https://geek.zshipu.com/post/web3.0/%E5%85%A8%E6%A0%88-Web3-%E5%BC%80%E5%8F%91%E5%AE%8C%E6%95%B4%E6%8C%87%E5%8D%97/
- 版权声明:本作品采用知识共享署名-非商业性使用-禁止演绎 4.0 国际许可协议进行许可,非商业转载请注明出处(作者,原文链接),商业转载请联系作者获得授权。
- 免责声明:本页面内容均来源于站内编辑发布,部分信息来源互联网,并不意味着本站赞同其观点或者证实其内容的真实性,如涉及版权等问题,请立即联系客服进行更改或删除,保证您的合法权益。转载请注明来源,欢迎对文章中的引用来源进行考证,欢迎指出任何有错误或不够清晰的表达。也可以邮件至 sblig@126.com